
Contents
- I. Introduction to Installing a Toilet from Scratch
- II. Step 1: Gather the Necessary Tools and Materials
- III. Step 2: Turn off the Water Supply
- IV. Step 3: Remove the Old Toilet
- V. Step 4: Prepare the Area for Installation
- 1. Gather the necessary tools and materials
- 2. Turn off the water supply
- 3. Empty the tank and bowl
- 4. Disconnect the water supply line
- 5. Remove the old toilet
- 6. Clean the flange and floor
- 7. Measure and mark the floor
- 8. Install the new wax ring
- 9. Position the new toilet
- 10. Secure the toilet
- 11. Reconnect the water supply line
- 12. Test for leaks
- 13. Level the toilet
- 14. Attach the toilet seat
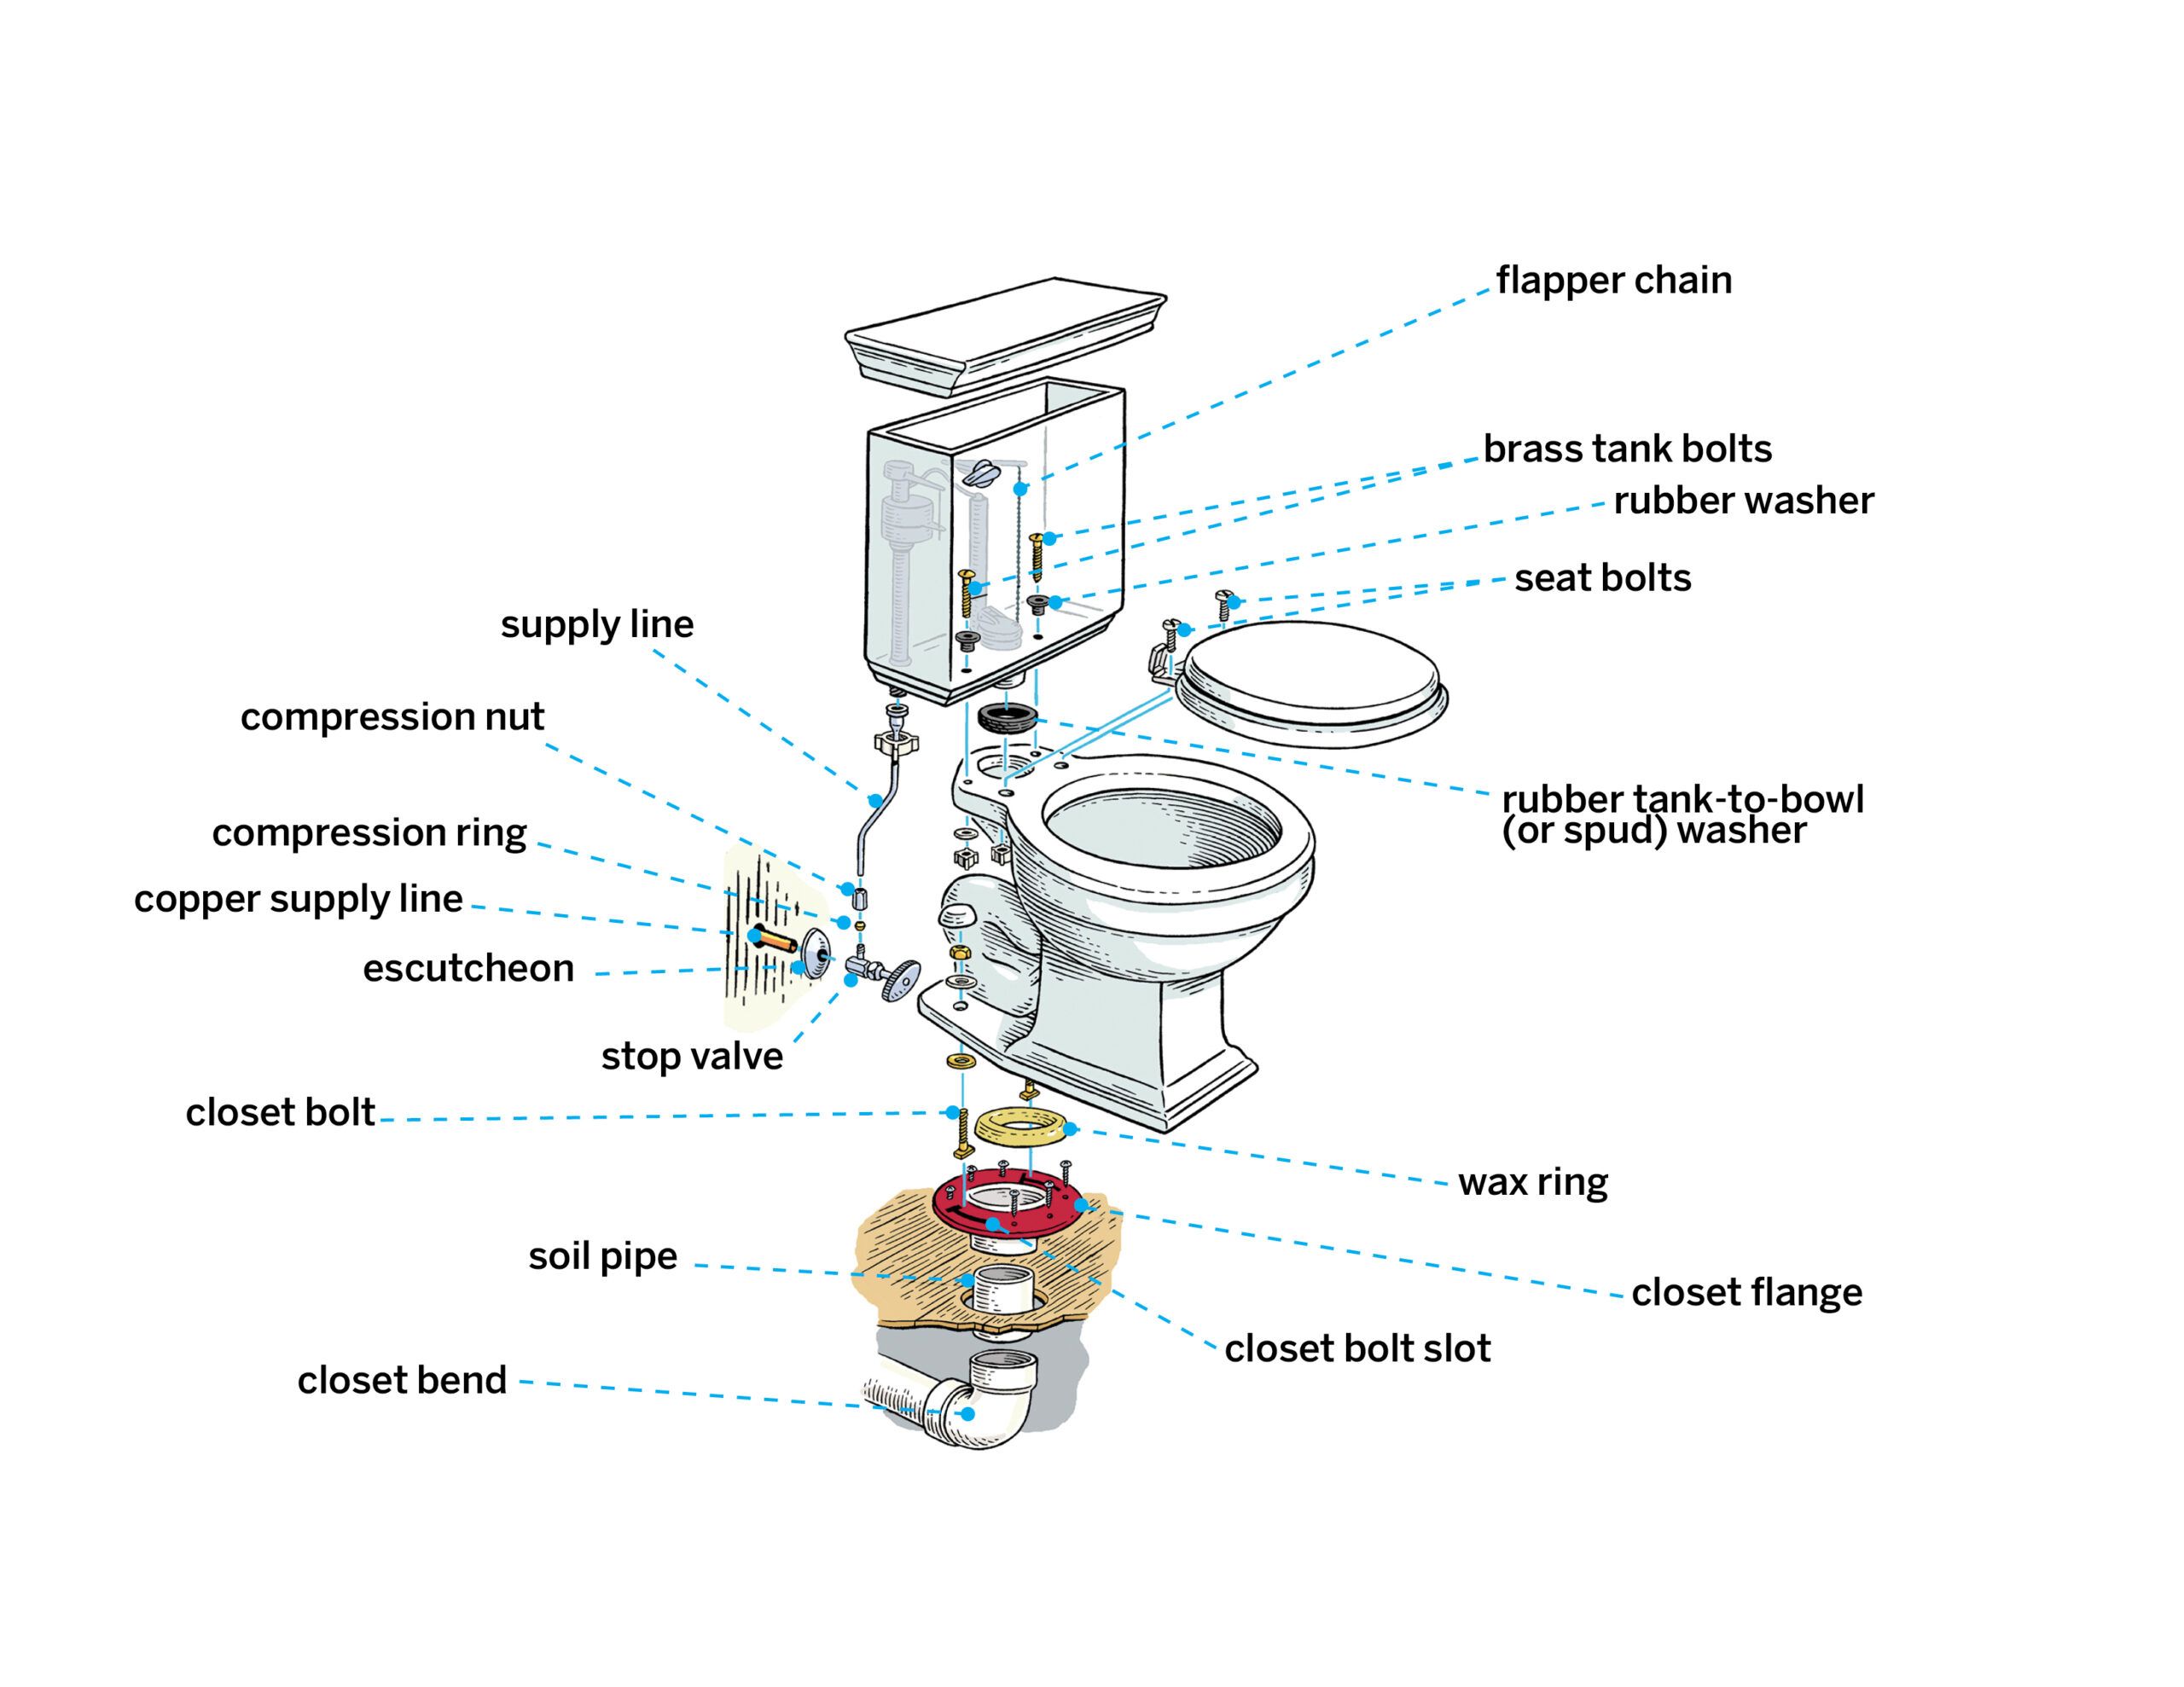
- VI. Step 5: Install the Wax Ring and Toilet Flange
- VII. Step 6: Attach the Toilet Bowl to the Floor
- VIII. Step 7: Connect the Water Supply
- IX. Step 8: Test the Toilet and Make Adjustments
I. Introduction to Installing a Toilet from Scratch

Installing a toilet from scratch may seem like a daunting task, but with the right tools and a little know-how, it can be a straightforward process. Whether you’re replacing an old toilet or installing a new one in a newly constructed bathroom, this step-by-step guide will walk you through the process.
Before you begin, gather all the necessary tools and materials. You’ll need a new toilet, wax ring, adjustable wrench, screwdriver, plunger, level, and a bucket. It’s also a good idea to have some rags or towels on hand to clean up any spills or messes.
The first step is to remove the old toilet. Start by shutting off the water supply to the toilet and flushing it to empty the tank. Disconnect the water supply line and remove the bolts securing the toilet to the floor. Carefully lift the toilet and set it aside.
Next, prepare the area for the new toilet. Clean the flange and inspect it for any damage. If necessary, replace the wax ring to ensure a watertight seal. Place the wax ring on the flange, making sure it is centered.
Now it’s time to install the new toilet. Carefully lower the toilet onto the wax ring, aligning the bolt holes with the flange. Gently press down to compress the wax ring and create a seal. Secure the toilet to the floor by tightening the bolts.
Once the toilet is securely in place, reconnect the water supply line and turn on the water. Check for any leaks and make any necessary adjustments. Finally, give the toilet a test flush to ensure everything is working properly.
Installing a toilet from scratch may take some time and effort, but with the right tools and instructions, it can be a manageable DIY project. By following these steps, you’ll have a new toilet installed and ready to use in no time.
II. Step 1: Gather the Necessary Tools and Materials

Before you start installing a toilet from scratch, it’s important to gather all the necessary tools and materials. Having everything you need at hand will make the process smoother and more efficient. Here’s a list of the essential items you’ll need:
- 1. Toilet bowl and tank
- 2. Wax ring
- 3. Closet bolts
- 4. Adjustable wrench
- 5. Screwdriver
- 6. Putty knife
- 7. Hacksaw
- 8. Level
- 9. Caulk gun
- 10. Silicone caulk
- 11. Bucket
- 12. Towels
Make sure to have all these tools and materials ready before you begin the installation process. It’s also a good idea to read the manufacturer’s instructions that come with the toilet to ensure you have a clear understanding of the installation steps.
1. Choosing the Right Toilet
When selecting a toilet for your installation, it’s important to consider factors such as the size of your bathroom, your budget, and your personal preferences. There are various types of toilets available, including one-piece toilets, two-piece toilets, and wall-mounted toilets.
One-piece toilets are sleek and easy to clean, while two-piece toilets are more traditional and generally less expensive. Wall-mounted toilets are a great option for small bathrooms as they save space and create a modern look.
Additionally, consider the flushing mechanism of the toilet. There are gravity-fed toilets, pressure-assisted toilets, and dual-flush toilets. Gravity-fed toilets are the most common and use the force of gravity to flush waste. Pressure-assisted toilets use compressed air to create a powerful flush, while dual-flush toilets offer two options for flushing, allowing you to conserve water.
2. Preparing the Bathroom
Before you start the installation process, it’s important to prepare the bathroom. Remove any items or obstacles near the toilet area to create a clear workspace. Lay down towels or old sheets to protect the floor from any potential water damage or scratches.
If you’re replacing an existing toilet, you’ll need to remove it first. Shut off the water supply to the toilet by turning the shut-off valve clockwise. Flush the toilet to drain the water from the tank and bowl. Use a sponge or towel to remove any remaining water from the tank and bowl.
Next, disconnect the water supply line from the bottom of the tank using an adjustable wrench. Loosen the nuts on the closet bolts located at the base of the toilet. Once the nuts are loose, lift the toilet bowl straight up and remove it from the closet bolts.
3. Installing the New Toilet
Now that you’ve prepared the bathroom and removed the old toilet, it’s time to install the new one. Start by placing a new wax ring on the flange, ensuring it is centered and properly aligned. The wax ring creates a watertight seal between the toilet and the floor.
Next, carefully lower the toilet bowl onto the wax ring, aligning the closet bolts with the holes on the base of the toilet. Apply downward pressure to compress the wax ring and create a secure seal. Once the toilet bowl is in place, place the tank on top and align it with the bowl.
Insert the closet bolts through the mounting holes on the base of the toilet and tighten the nuts to secure the toilet in place. Use a level to ensure the toilet is straight and adjust the position if necessary. Once the toilet is level, tighten the nuts on the closet bolts to secure the tank to the bowl.
Connect the water supply line to the fill valve on the bottom of the tank and tighten the nut with an adjustable wrench. Slowly turn on the water supply to fill the tank. Check for any leaks around the base of the toilet and tighten the nuts on the closet bolts if necessary.
4. Finishing Touches
Once the toilet is securely installed, it’s time to add the finishing touches. Use a hacksaw to trim the closet bolts if they extend too far above the nuts. Apply silicone caulk around the base of the toilet to create a waterproof seal and prevent any water from seeping underneath.
Finally, flush the toilet a few times to ensure it is functioning properly. Check for any leaks or unusual sounds during the flushing process. If everything looks and sounds good, congratulations! You have successfully installed a toilet from scratch.
Remember to clean up any tools or materials used during the installation process and dispose of any waste properly. Enjoy your newly installed toilet and the convenience it brings to your bathroom!
III. Step 2: Turn off the Water Supply

Now that you have gathered all the necessary tools and materials for installing a toilet from scratch, it’s time to move on to the next step: turning off the water supply. This step is crucial to ensure that you can work on the toilet without any water leakage or accidents.
1. Locate the Water Shut-Off Valve
The first thing you need to do is locate the water shut-off valve. This valve is usually located near the base of the toilet or on the wall behind it. It is a small lever or knob that controls the flow of water to the toilet.
Take a moment to familiarize yourself with the valve and its operation. Make sure you know how to turn it off and on before proceeding.
2. Turn off the Water Supply
Once you have located the shut-off valve, it’s time to turn off the water supply. To do this, simply turn the valve clockwise until it is fully closed. This will stop the flow of water to the toilet.
It’s important to note that some shut-off valves may be stiff or difficult to turn, especially if they haven’t been used in a while. If you encounter any resistance, try using a pair of pliers or a wrench to help you turn the valve.
Once the valve is fully closed, check the toilet bowl to ensure that the water has stopped flowing. If there is still water in the bowl, it means that the shut-off valve may not be fully closed. In this case, you may need to tighten the valve further or seek assistance from a professional plumber.
3. Drain the Remaining Water
Even after turning off the water supply, there may still be some water left in the toilet tank and bowl. To drain this remaining water, you can either flush the toilet or use a sponge or towel to soak it up.
If you choose to flush the toilet, simply press and hold the flush lever until all the water has been drained from the tank and bowl. Keep in mind that this method may cause the water level in the bowl to rise, so be prepared to use a sponge or towel to soak up any excess water.
If you prefer to use a sponge or towel, place it in the bowl and soak up the water. Squeeze out the water into a bucket or sink, and repeat the process until the bowl is completely empty.
4. Double-Check for Water Leakage
Before proceeding with the installation process, it’s important to double-check for any water leakage. Inspect the shut-off valve, supply line, and toilet connections for any signs of water dripping or pooling.
If you notice any leaks, it’s crucial to address them before continuing. Tighten any loose connections or replace faulty parts as necessary. Ignoring leaks can lead to water damage and other costly repairs down the line.
Once you are confident that there are no water leaks, you can proceed to the next step of installing the toilet from scratch.
Remember, turning off the water supply is an essential step in installing a toilet from scratch. By following these instructions and taking the necessary precautions, you can ensure a smooth and hassle-free installation process.
IV. Step 3: Remove the Old Toilet
Removing the old toilet is an essential step in installing a new one. It may seem like a daunting task, but with the right tools and guidance, it can be done smoothly. In this section, I will walk you through the process of removing the old toilet, ensuring that you do it correctly and safely.
Gather the necessary tools
Before you begin, make sure you have all the tools you need to remove the old toilet. Here are the essential tools you’ll need:
- Adjustable wrench
- Sponge
- Bucket
- Gloves
- Putty knife
- Plunger
- Old towels or rags
Having these tools on hand will make the process much easier and more efficient.
Turn off the water supply
Before you start removing the old toilet, you need to turn off the water supply. Locate the shut-off valve, which is usually located behind or near the toilet. Turn the valve clockwise to shut off the water flow.
Once the water supply is turned off, flush the toilet to drain the remaining water in the tank and bowl. Use a plunger to remove any excess water if necessary. This will make the removal process cleaner and prevent water from spilling onto the floor.
Disconnect the water supply line
With the water supply turned off and the toilet flushed, you can now disconnect the water supply line. Use an adjustable wrench to loosen the nut connecting the supply line to the bottom of the toilet tank. Once the nut is loose, carefully remove the supply line from the tank. Be prepared for some water to drip out, so have a bucket and sponge ready to catch any spills.
Remove the toilet tank
Next, you’ll need to remove the toilet tank from the bowl. Start by removing the tank lid and setting it aside. Locate the bolts that secure the tank to the bowl. Use an adjustable wrench to loosen and remove the nuts from the bolts. Once the nuts are removed, lift the tank off the bowl and place it in a safe location.
Detach the toilet bowl
Now it’s time to detach the toilet bowl from the floor. Start by removing the caps covering the bolts at the base of the toilet. Use a putty knife or a flathead screwdriver to pry off the caps. Once the caps are removed, use an adjustable wrench to loosen and remove the nuts from the bolts.
With the nuts removed, carefully lift the toilet bowl off the floor. It may be helpful to have someone assist you with this step, as toilets can be heavy and awkward to lift on your own. Place the toilet bowl on a towel or rag to prevent any damage to the floor.
Clean the area
With the old toilet removed, take the opportunity to clean the area thoroughly. Use a sponge and mild cleaning solution to wipe down the floor and remove any residue or stains left behind by the old toilet. This will ensure a clean and sanitary surface for the installation of the new toilet.
Dispose of the old toilet responsibly. Check with your local waste management facility for guidelines on how to properly dispose of the old toilet. Some facilities may require you to separate the tank and bowl before disposal.
With the old toilet successfully removed and the area cleaned, you are now ready to move on to the next step of installing a new toilet. Stay tuned for the next section, where I will guide you through the process of preparing the area for the installation of the new toilet.
V. Step 4: Prepare the Area for Installation

Before you start installing a toilet from scratch, it’s important to prepare the area properly. This will ensure a smooth and successful installation process. Follow these steps to prepare the area:
1. Gather the necessary tools and materials
Before you begin, make sure you have all the tools and materials you’ll need for the installation. This includes:
- Adjustable wrench
- Screwdriver
- Plumber’s putty
- Wax ring
- Toilet bolts
- Level
- Tape measure
- Hacksaw (if needed)
Having these tools and materials ready will save you time and ensure a smooth installation process.
2. Turn off the water supply
Before you remove the old toilet, you need to turn off the water supply. Locate the shut-off valve, usually located behind or near the toilet. Turn the valve clockwise to shut off the water supply.
3. Empty the tank and bowl
Flush the toilet to empty the tank and bowl. Use a plunger to remove any remaining water from the bowl. This will make it easier to remove the old toilet.
4. Disconnect the water supply line
Using an adjustable wrench, loosen the nut connecting the water supply line to the bottom of the tank. Once the nut is loose, carefully remove the water supply line from the tank. Place a bucket or towel underneath to catch any water that may drip.
5. Remove the old toilet
Now it’s time to remove the old toilet. Start by removing the caps covering the toilet bolts at the base of the toilet. Use a screwdriver to loosen and remove the nuts securing the toilet bolts. Once the nuts are removed, carefully lift the toilet straight up and off the floor. You may need assistance as toilets can be heavy.
6. Clean the flange and floor
With the old toilet removed, you’ll need to clean the flange and the floor. Use a putty knife to scrape away any old wax or debris from the flange. Wipe down the flange and the surrounding area with a damp cloth to ensure a clean surface for the new toilet.
7. Measure and mark the floor
Measure the distance from the wall to the center of the flange. Use a tape measure to mark this distance on the floor. This will help you properly align the new toilet during installation.
8. Install the new wax ring
Place the new wax ring on the flange, making sure it is centered over the opening. Gently press down to secure the wax ring in place. Make sure the wax ring is properly aligned with the toilet flange to ensure a watertight seal.
9. Position the new toilet
Carefully lower the new toilet onto the wax ring, aligning the toilet bolts with the holes on the base of the toilet. Apply gentle pressure to compress the wax ring and create a seal. Make sure the toilet is properly aligned with the marks on the floor.
10. Secure the toilet
Once the toilet is in position, place the washers and nuts onto the toilet bolts. Use a screwdriver and adjustable wrench to tighten the nuts, but be careful not to overtighten as this can damage the toilet. Check the toilet for stability and adjust as needed.
11. Reconnect the water supply line
Reconnect the water supply line to the bottom of the tank. Use an adjustable wrench to tighten the nut securely. Turn the shut-off valve counterclockwise to restore the water supply.
12. Test for leaks
Once the water supply is turned on, check for any leaks around the base of the toilet and the water supply line. If you notice any leaks, tighten the nuts or make adjustments as necessary.
13. Level the toilet
Use a level to ensure the toilet is level from front to back and side to side. If needed, place shims under the toilet to achieve a level position. Once the toilet is level, trim the excess shims with a hacksaw.
14. Attach the toilet seat
Finally, attach the toilet seat according to the manufacturer’s instructions. Make sure the seat is securely fastened to the toilet.
With the area properly prepared, you are now ready to move on to the next step of installing a toilet from scratch. Follow the remaining steps to complete the installation process and enjoy a fully functional and efficient toilet in your bathroom.
VI. Step 5: Install the Wax Ring and Toilet Flange
Now that you have successfully removed the old toilet and prepared the area for installation, it’s time to move on to the next step: installing the wax ring and toilet flange. This crucial step ensures a watertight seal and stability for your new toilet.
1. Gather the Necessary Tools and Materials
Before you begin, make sure you have all the tools and materials you’ll need for this step:
- Wax ring
- Toilet flange
- Adjustable wrench
- Screwdriver
- Plumber’s putty
- Level
2. Position the Wax Ring
Start by placing the wax ring on the flange, ensuring that it is centered and properly aligned. The wax ring creates a seal between the toilet and the waste pipe, preventing any leaks.
3. Install the Toilet Flange
Next, carefully lower the toilet flange onto the wax ring. Make sure it is securely seated and level with the floor. Use the adjustable wrench to tighten the bolts on the flange, ensuring that it is firmly attached to the floor.
4. Secure the Toilet to the Flange
Now it’s time to install the toilet onto the flange. Carefully lift the toilet bowl and align it with the flange, making sure the bolts on the flange fit into the corresponding holes on the toilet base.
Once aligned, gently lower the toilet bowl onto the flange, applying even pressure to create a proper seal with the wax ring. Use your body weight to compress the wax ring and ensure a tight fit.
Once the toilet bowl is in place, insert the bolts through the mounting holes and tighten them with a screwdriver. Be careful not to overtighten, as this can crack the toilet bowl.
5. Check for Stability and Levelness
After securing the toilet to the flange, check for stability and levelness. Sit on the toilet and gently rock back and forth to ensure it is securely fastened. Use a level to make sure the toilet is perfectly level from side to side and front to back.
If the toilet is not level, you can use shims to adjust its position. Simply place the shims under the base of the toilet until it is level. Once the toilet is stable and level, you can proceed to the next step.
6. Apply Plumber’s Putty
To complete the installation, apply plumber’s putty around the base of the toilet. This helps create a watertight seal and prevents any water from leaking out.
Take a small amount of plumber’s putty and roll it into a thin rope. Gently press the putty onto the base of the toilet, ensuring it covers the entire circumference. Smooth out any excess putty with your fingers.
7. Connect the Water Supply
Finally, it’s time to connect the water supply to the toilet. Locate the water supply valve, usually located behind the toilet or in the wall nearby. Turn the valve clockwise to shut off the water.
Next, connect the water supply line to the bottom of the toilet tank. Hand-tighten the nut, and then give it an additional quarter turn with an adjustable wrench to ensure a secure connection.
Once the water supply line is connected, turn the water supply valve counterclockwise to restore the water flow. Check for any leaks around the connections and tighten as necessary.
Congratulations! You have successfully installed the wax ring and toilet flange. The next step is to complete the final installation of the toilet tank and seat, which will be covered in the next section.
VII. Step 6: Attach the Toilet Bowl to the Floor
Attaching the toilet bowl to the floor is a crucial step in the installation process. Follow these steps to ensure a secure and stable connection:
1. Gather the necessary tools and materials
Before you begin, make sure you have all the tools and materials you need. This includes a wrench, screws, a wax ring, a putty knife, and a level. Having everything ready will save you time and make the process smoother.
2. Position the wax ring
Take the wax ring and position it on the flange, which is the pipe fitting on the floor. The wax ring creates a watertight seal between the toilet bowl and the floor, preventing leaks. Make sure the wax ring is centered on the flange.
3. Lower the toilet bowl onto the wax ring
With the help of a friend or family member, carefully lower the toilet bowl onto the wax ring. Make sure the toilet bowl is aligned with the flange and sits evenly on the floor. Apply gentle pressure to compress the wax ring and create a tight seal.
4. Secure the toilet bowl to the floor
Using the screws provided, secure the toilet bowl to the floor. Insert the screws through the holes at the base of the toilet bowl and into the flange. Use a wrench to tighten the screws, but be careful not to overtighten, as this can damage the toilet bowl.
5. Check for stability
Once the toilet bowl is securely attached to the floor, check for stability. Sit on the toilet bowl and rock back and forth to ensure it doesn’t wobble. If you notice any movement, tighten the screws further or adjust the position of the toilet bowl.
6. Use a level to ensure proper alignment
Place a level on top of the toilet bowl to check for proper alignment. The bowl should be level from front to back and side to side. If it’s not, adjust the position of the toilet bowl by loosening the screws and repositioning it until it is level.
7. Clean up any excess wax
After securing the toilet bowl, use a putty knife to remove any excess wax that may have squeezed out from under the bowl. This will give the installation a clean and professional look.
8. Connect the water supply
Finally, connect the water supply to the toilet bowl. This typically involves attaching a flexible hose from the water valve on the wall to the fill valve on the bottom of the toilet tank. Follow the manufacturer’s instructions for this step.
By following these steps, you can successfully attach the toilet bowl to the floor. Remember to take your time and double-check your work to ensure a secure and stable installation.
VIII. Step 7: Connect the Water Supply
Now that you have successfully installed the toilet bowl and tank, it’s time to connect the water supply. This step is crucial for ensuring that your toilet functions properly and doesn’t leak. Follow these instructions to connect the water supply:
Gather the necessary tools and materials
Before you begin, make sure you have all the tools and materials you need. This includes an adjustable wrench, Teflon tape, a flexible water supply line, and a bucket or towel to catch any water that may leak during the process.
Shut off the water supply
Locate the shut-off valve near the toilet and turn it clockwise to shut off the water supply. This will prevent any water from flowing while you connect the water supply line.
Prepare the water supply line
Take the flexible water supply line and wrap Teflon tape around the threads at both ends. This will create a watertight seal and prevent any leaks. Make sure to wrap the tape in a clockwise direction.
Connect the water supply line
Attach one end of the water supply line to the shut-off valve by screwing it on clockwise. Use an adjustable wrench to tighten it securely, but be careful not to overtighten and damage the valve or the supply line.
Next, connect the other end of the water supply line to the fill valve on the bottom of the toilet tank. Again, screw it on clockwise and use the adjustable wrench to tighten it securely.
Turn on the water supply
Once the water supply line is securely connected, turn the shut-off valve counterclockwise to turn on the water supply. Check for any leaks around the connections and tighten them if necessary.
Test the toilet
Flush the toilet and check for any leaks or water flow issues. Make sure the tank fills up properly and there are no leaks around the water supply line or the fill valve. If you notice any problems, tighten the connections or consult a professional plumber for assistance.
Congratulations! You have successfully connected the water supply to your newly installed toilet. Now you can enjoy the convenience and functionality of your fully operational bathroom fixture.
IX. Step 8: Test the Toilet and Make Adjustments
After successfully installing the toilet, it’s time to test it and make any necessary adjustments. This step is crucial to ensure that the toilet functions properly and doesn’t cause any issues in the future. Here’s what you need to do:
1. Fill the Tank with Water
Start by filling the tank with water. You can do this by turning on the water supply valve and allowing the tank to fill up. Make sure the water level reaches the fill line indicated inside the tank. If the water level is too low, adjust the float valve to allow more water to enter the tank.
2. Check for Leaks
Once the tank is filled, carefully inspect the area around the base of the toilet and the connections for any signs of leaks. Look for water pooling on the floor or dripping from the tank or pipes. If you notice any leaks, tighten the connections or replace any faulty parts to fix the issue.
3. Flush the Toilet
Now it’s time to test the flushing mechanism. Press the flush lever and observe how the toilet flushes. The water should flow smoothly from the tank into the bowl, creating a strong and efficient flush. If the flush is weak or incomplete, adjust the chain or flapper to improve the flushing performance.
4. Check the Water Level in the Bowl
After flushing, check the water level in the bowl. It should be at a normal level, neither too high nor too low. If the water level is too low, adjust the fill valve to allow more water to enter the bowl. On the other hand, if the water level is too high and overflowing, adjust the float valve to reduce the water level.
5. Test the Toilet’s Stability
Next, check the stability of the toilet. Sit on the toilet seat and rock back and forth to ensure that it doesn’t wobble or move. If you notice any instability, tighten the bolts securing the toilet to the floor. You can also use shims to level the toilet if needed.
6. Check the Flushing and Refilling Process
Observe the flushing and refilling process to ensure that it works smoothly. The tank should refill completely after each flush, and there should be no delays or interruptions in the refilling process. If you notice any issues, such as slow refilling or noisy operation, adjust the fill valve or replace any faulty components.
7. Test the Toilet Seat
Lastly, test the toilet seat for comfort and stability. Sit on the seat and make sure it feels secure and doesn’t shift or slide. If necessary, tighten the seat bolts to ensure a snug fit. Additionally, check if the seat is properly aligned and centered on the bowl.
By following these steps and thoroughly testing the toilet, you can ensure that it functions properly and meets your expectations. If you encounter any persistent issues or concerns, don’t hesitate to seek professional assistance to address them effectively.

Michael Rasmussen is an accomplished writer with a passion for creating engaging content. Born and raised in a small town in Denmark, Michael developed a love for storytelling from a young age. He pursued his education at the prestigious Aarhus University, where he obtained a Bachelor’s degree in Literature and Creative Writing. With a unique perspective on life, Michael’s writing often delves into the intricacies of everyday experiences, including his quirky fascination with toilets. His ability to blend humor and insight has garnered him a loyal following of readers who appreciate his distinctive style. When he’s not busy crafting captivating narratives, Michael enjoys exploring the great outdoors and seeking inspiration in unexpected places.