
Contents
- I. Introduction to Installing/Replacing a Toilet Tank
- II. Tools and Materials Needed for the Job
- III. Step 1: Preparation and Safety Measures
- IV. Step 2: Removing the Old Toilet Tank
- Gather the Required Tools and Materials
- Turn Off the Water Supply
- Flush the Toilet and Remove Excess Water
- Disconnect the Water Supply Line
- Remove the Tank-to-Bowl Bolts
- Separate the Tank from the Bowl
- Remove the Old Tank Gasket
- Clean the Area
- Apply Plumber’s Tape
- Prepare the New Tank
- Install the New Tank
- Secure the Tank
- Reconnect the Water Supply Line
- Turn On the Water Supply
- V. Step 3: Installing the New Toilet Tank
- VI. Step 4: Connecting the Water Supply
- VII. Step 5: Checking for Leaks and Finishing Up
- VIII. Frequently Asked Questions (FAQs) about Installing/Replacing a Toilet Tank
- 1. How do I know if I need to replace my toilet tank?
- 2. Can I install a new toilet tank myself?
- 3. What tools do I need to install a toilet tank?
- 4. How long does it take to install a toilet tank?
- 5. Do I need to shut off the water supply before installing a new toilet tank?
- 6. Can I reuse the existing toilet bowl when replacing the tank?
- 7. How do I properly seal the toilet tank to prevent leaks?
- 8. Are there any safety precautions I should take when installing a toilet tank?
- 9. Can I replace a toilet tank without removing the entire toilet?
- 10. How often should I replace my toilet tank?
I. Introduction to Installing/Replacing a Toilet Tank
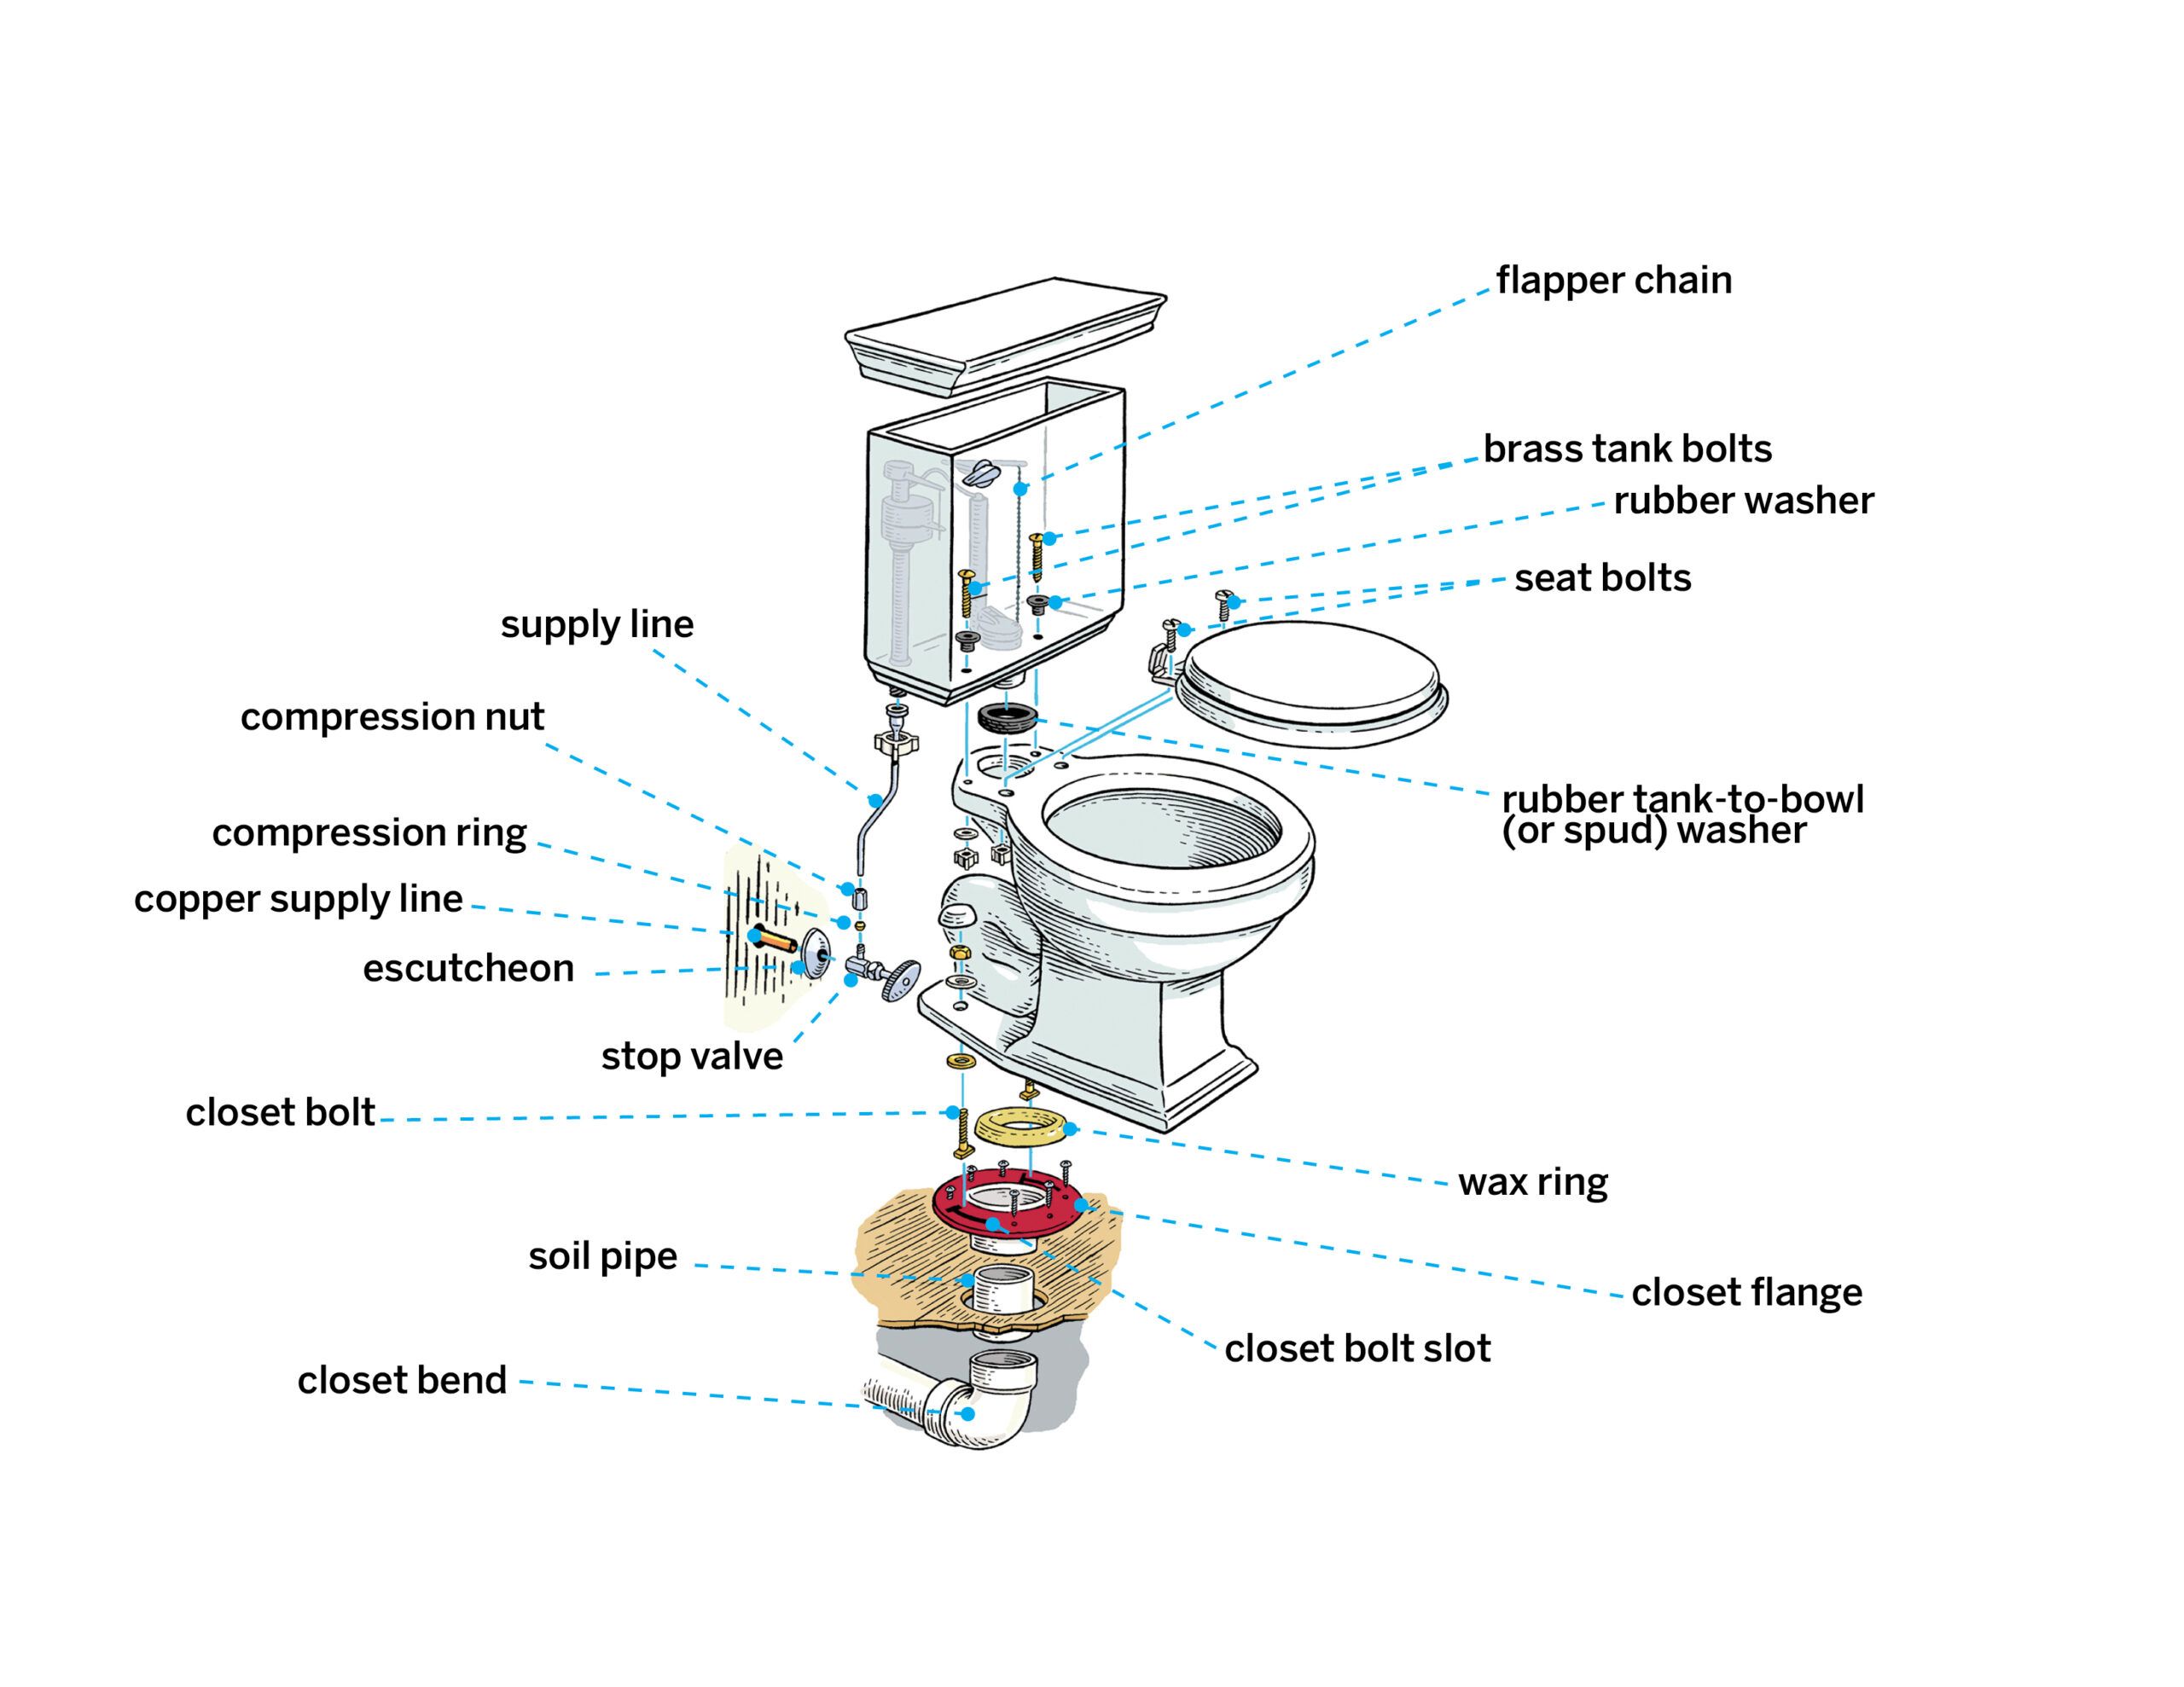
Installing or replacing a toilet tank may seem like a daunting task, but with the right tools and a little know-how, it can be a straightforward process. Whether you’re upgrading your bathroom or dealing with a leaky tank, this guide will walk you through the steps to get the job done.
Before you begin, gather all the necessary tools and materials. You’ll need an adjustable wrench, a screwdriver, a bucket, a new toilet tank, and a wax ring. It’s also a good idea to have some rags or towels on hand to clean up any spills.
Start by turning off the water supply to the toilet. This is usually done by turning the shut-off valve located behind the toilet clockwise until it stops. Flush the toilet to drain any remaining water from the tank.
Next, disconnect the water supply line from the bottom of the tank using an adjustable wrench. Place a bucket under the tank to catch any water that may still be in the line.
With the water supply line disconnected, you can now remove the old tank. Start by unscrewing the bolts that hold the tank to the bowl using a screwdriver or wrench. Carefully lift the tank off the bowl and set it aside.
Before installing the new tank, clean the area where the tank will sit on the bowl. Remove any old wax residue and ensure the surface is clean and dry. Place a new wax ring on the bowl’s outlet, making sure it is centered.
Now it’s time to install the new tank. Carefully lower the tank onto the bowl, aligning the bolt holes with the holes on the bowl. Insert the bolts and tighten them securely using a screwdriver or wrench.
Reconnect the water supply line to the bottom of the tank and turn on the water supply. Check for any leaks and tighten the connections if necessary. Once you’re sure there are no leaks, give the toilet a test flush to ensure everything is working properly.
That’s it! You’ve successfully installed or replaced a toilet tank. Remember to clean up any mess and dispose of the old tank properly. With a little patience and the right tools, you can tackle this DIY project with confidence.
II. Tools and Materials Needed for the Job

When it comes to installing or replacing a toilet tank, having the right tools and materials is essential. Here are the items you’ll need to successfully complete the job:
1. Adjustable Wrench
An adjustable wrench is a versatile tool that will come in handy during the installation process. It allows you to tighten or loosen nuts and bolts of various sizes, making it a must-have for any DIY project.
2. Screwdriver
A screwdriver is another essential tool that you’ll need for removing and installing screws. Make sure to have both a flathead and a Phillips head screwdriver on hand, as different parts of the toilet tank may require different types of screws.
3. Plunger
While not directly related to the installation process, having a plunger nearby is always a good idea. In case of any clogs or blockages, a plunger can help you quickly resolve the issue without having to call a plumber.
4. Putty Knife
A putty knife is useful for scraping away old caulk or putty from the base of the toilet tank. This will ensure a clean surface for the new installation and help prevent any leaks or water damage.
5. Caulk Gun
If you’re replacing the toilet tank, you’ll need a caulk gun to apply a fresh bead of caulk around the base. This will create a watertight seal and prevent any leaks from occurring.
6. Toilet Tank Replacement Kit
If you’re replacing the entire toilet tank, it’s important to have a toilet tank replacement kit. This kit typically includes all the necessary components, such as the tank, flush valve, fill valve, and gaskets.
7. Towels or Rags
Having towels or rags on hand is essential for cleaning up any spills or drips during the installation process. It’s always better to be prepared and have something to quickly absorb any water or other liquids.
8. Safety Gloves and Goggles
While not directly related to the tools and materials, it’s important to prioritize safety during any DIY project. Wearing safety gloves and goggles will help protect your hands and eyes from any potential hazards.
By having these tools and materials ready before you start the installation process, you’ll be well-prepared to tackle the job with confidence. Remember to follow the manufacturer’s instructions and take all necessary safety precautions to ensure a successful installation or replacement of your toilet tank.
III. Step 1: Preparation and Safety Measures
Before you begin the process of installing or replacing a toilet tank, it is important to take the necessary preparation and safety measures. This will ensure that the task is completed smoothly and without any accidents. Here are the steps you should follow:
Gather the necessary tools and materials
First and foremost, gather all the tools and materials you will need for the installation or replacement. This will save you time and effort later on. Some of the essential tools and materials include:
- Adjustable wrench
- Screwdriver
- Plumber’s tape
- New toilet tank
- New wax ring
- Bolts and nuts
- Bucket or towels
Make sure you have all these items readily available before you start the process.
Turn off the water supply
Before you begin working on the toilet tank, it is crucial to turn off the water supply. Locate the shut-off valve, which is usually located behind or near the toilet. Turn the valve clockwise to shut off the water supply. Flush the toilet to drain any remaining water in the tank.
Remove the old toilet tank
Once the water supply is turned off, you can proceed to remove the old toilet tank. Start by disconnecting the water supply line from the bottom of the tank. Use an adjustable wrench to loosen the nut and disconnect the line. Place a bucket or towels underneath to catch any water that may spill out.
Next, remove the bolts that secure the tank to the bowl. These bolts are usually located at the bottom of the tank. Use a screwdriver or wrench to loosen and remove the bolts. Carefully lift the tank off the bowl and set it aside.
Clean the area
With the old tank removed, take the time to clean the area where the new tank will be installed. Remove any debris or residue from the bowl and the floor. This will ensure a clean and secure fit for the new tank.
Install the new toilet tank
Now it’s time to install the new toilet tank. Start by placing a new wax ring on the flange, which is the opening on the floor where the toilet sits. Make sure the wax ring is centered and properly aligned.
Lower the new tank onto the bowl, aligning the bolt holes on the tank with the holes on the bowl. Insert the bolts through the holes and secure them with nuts. Use a screwdriver or wrench to tighten the nuts, but be careful not to overtighten and crack the porcelain.
Reconnect the water supply line to the bottom of the tank. Use plumber’s tape to ensure a tight and leak-free connection. Turn on the water supply and check for any leaks. If there are no leaks, you can proceed to the next step.
Test the toilet
Once the new tank is securely installed, it’s time to test the toilet. Turn on the water supply and let the tank fill up. Flush the toilet to check if it is functioning properly. Make sure there are no leaks and that the water is flowing smoothly.
If everything is working as expected, congratulations! You have successfully completed the installation or replacement of a toilet tank. Clean up any remaining debris or water and enjoy your newly installed toilet.
Remember, if you are unsure about any step of the process or encounter any difficulties, it is always best to consult a professional plumber. Safety should be your top priority when working with plumbing fixtures.
IV. Step 2: Removing the Old Toilet Tank

Removing the old toilet tank is an essential step in the process of installing or replacing a toilet tank. Here, I will guide you through the necessary steps to ensure a smooth and successful removal process.
Gather the Required Tools and Materials
Before you begin, make sure you have all the necessary tools and materials at hand. Here’s a list of what you’ll need:
- Adjustable wrench
- Sponge or towel
- Bucket or container
- Plastic gloves
- Plumber’s tape
- New toilet tank (if replacing)
Turn Off the Water Supply
First, locate the shut-off valve near the base of the toilet. Turn it clockwise to shut off the water supply. This will prevent any water from flowing into the tank while you work.
Flush the Toilet and Remove Excess Water
Next, flush the toilet to remove as much water as possible from the tank. Use a sponge or towel to soak up any remaining water. Place a bucket or container nearby to collect any excess water that may spill during the removal process.
Disconnect the Water Supply Line
Using an adjustable wrench, loosen the nut connecting the water supply line to the bottom of the toilet tank. Once loosened, carefully remove the supply line from the tank. Be prepared for some water to drip out during this step.
Remove the Tank-to-Bowl Bolts
Locate the tank-to-bowl bolts on the underside of the toilet tank. These bolts secure the tank to the bowl. Use the adjustable wrench to loosen and remove these bolts. Keep in mind that they may be tightly secured, so some effort may be required.
Separate the Tank from the Bowl
Once the tank-to-bowl bolts are removed, you can now separate the tank from the bowl. Gently lift the tank straight up and set it aside in a safe place. Be cautious as the tank may still contain some water.
Remove the Old Tank Gasket
With the tank removed, you’ll notice a gasket between the tank and the bowl. This gasket creates a watertight seal. Carefully remove the old gasket and discard it. It’s important to replace the gasket when installing a new tank to ensure a proper seal.
Clean the Area
Before installing the new tank, take the time to clean the area where the old tank was located. Use a sponge or towel to wipe away any debris or residue. This will help create a clean surface for the new tank to sit on.
Apply Plumber’s Tape
Before installing the new tank, apply plumber’s tape to the threaded portion of the tank-to-bowl bolts. This tape will help create a secure and leak-free connection between the tank and the bowl.
Prepare the New Tank
If you’re replacing the old tank with a new one, make sure to follow the manufacturer’s instructions for assembly. This may involve attaching the flush valve, fill valve, and other components to the tank. Refer to the instruction manual for specific details.
Install the New Tank
Once the new tank is prepared, carefully lower it onto the bowl, aligning the tank-to-bowl bolts with the corresponding holes on the bowl. Gently press the tank down to create a secure connection.
Secure the Tank
With the tank in place, reinsert and tighten the tank-to-bowl bolts. Use the adjustable wrench to ensure they are securely fastened. Be careful not to overtighten, as this may cause damage to the tank or bowl.
Reconnect the Water Supply Line
Reattach the water supply line to the bottom of the tank. Use the adjustable wrench to tighten the nut and create a watertight seal. Make sure the connection is secure and free from any leaks.
Turn On the Water Supply
Finally, turn the shut-off valve counterclockwise to restore the water supply to the toilet. Allow the tank to fill with water and check for any leaks around the connections. If you notice any leaks, tighten the connections further or consider replacing any faulty parts.
That’s it! You have successfully removed the old toilet tank and installed a new one, or replaced the old tank with a new one. Remember to follow the manufacturer’s instructions and take necessary safety precautions throughout the process. With a little effort and attention to detail, you can have a fully functional and reliable toilet tank in no time.
V. Step 3: Installing the New Toilet Tank
Now that you have successfully removed the old toilet tank, it’s time to install the new one. Follow these steps to ensure a smooth and efficient installation process:
Gather the Necessary Tools and Materials
Before you begin, make sure you have all the tools and materials you need. Here’s a list of what you’ll typically require:
- New toilet tank
- Adjustable wrench
- Screwdriver
- Wax ring
- Bolts and nuts
- Water supply line
- Bucket or towel
Prepare the Area
Start by preparing the area where the new toilet tank will be installed. Place a towel or bucket beneath the toilet bowl to catch any water that may spill during the installation process. This will help prevent any damage to your bathroom floor.
Attach the Tank to the Bowl
Begin by attaching the tank to the bowl. Place the tank onto the bowl, aligning the mounting holes on both components. Insert the bolts through the mounting holes and secure them with nuts. Use an adjustable wrench to tighten the nuts, ensuring a secure connection between the tank and bowl.
Install the Wax Ring
Next, install the wax ring onto the bottom of the toilet bowl. The wax ring creates a watertight seal between the toilet and the floor. Carefully place the wax ring onto the flange, ensuring it is centered properly.
Position the Tank
Once the wax ring is in place, carefully position the tank onto the bowl. Make sure the bolts on the bottom of the tank align with the mounting holes on the bowl. Gently press the tank down to compress the wax ring and create a tight seal.
Tighten the Bolts
With the tank in position, tighten the bolts that secure the tank to the bowl. Use an adjustable wrench to tighten the nuts, but be careful not to overtighten, as this can cause damage to the toilet components.
Connect the Water Supply Line
Now it’s time to connect the water supply line to the bottom of the toilet tank. Insert one end of the supply line into the fill valve on the bottom of the tank and tighten the nut to secure it in place. Connect the other end of the supply line to the water supply valve on the wall.
Turn on the Water
Once the water supply line is connected, turn on the water supply valve to allow water to fill the tank. Check for any leaks around the connections and tighten them if necessary. Allow the tank to fill completely.
Test the Flush
Finally, test the flush to ensure everything is working properly. Press the flush lever and observe the water flow. Check for any leaks or abnormalities in the flushing process. If everything looks good, congratulations! You have successfully installed your new toilet tank.
Remember, if you encounter any difficulties during the installation process or if you are unsure about any step, it’s always a good idea to consult a professional plumber. They have the expertise and experience to handle any plumbing issues and ensure a proper installation.
VI. Step 4: Connecting the Water Supply
Now that you have successfully installed the toilet tank onto the bowl, it’s time to connect the water supply. This step is crucial as it ensures that your toilet will have a steady flow of water for flushing and refilling the tank. Follow these simple instructions to connect the water supply:
Gather the Necessary Tools and Materials
Before you begin, make sure you have all the tools and materials you need. Here’s a list of what you’ll need:
- Adjustable wrench
- Teflon tape
- Flexible water supply line
- Bucket or towel
Turn Off the Water Supply
Locate the shut-off valve behind the toilet and turn it clockwise to shut off the water supply. This will prevent any water from flowing into the toilet while you work on connecting the water supply.
Attach the Water Supply Line
Take the flexible water supply line and attach one end to the bottom of the toilet tank where the water inlet valve is located. Use an adjustable wrench to tighten the connection, ensuring that it is secure but not overly tight to avoid damaging the threads.
Apply Teflon Tape
Before connecting the other end of the water supply line to the shut-off valve, wrap Teflon tape around the threads of the shut-off valve. This will create a watertight seal and prevent any leaks. Wrap the tape in a clockwise direction, overlapping the threads as you go.
Connect the Water Supply Line
With the Teflon tape in place, connect the other end of the water supply line to the shut-off valve. Again, use an adjustable wrench to tighten the connection, making sure it is secure. Be careful not to overtighten, as this can cause damage.
Turn On the Water Supply
Once the water supply line is securely connected, turn the shut-off valve counterclockwise to turn on the water supply. Check for any leaks around the connections. If you notice any leaks, tighten the connections slightly until the leaks stop.
Test the Toilet
With the water supply connected, it’s time to test the toilet. Flush the toilet and observe the water flow. Make sure the tank refills properly and there are no leaks. If everything looks good, congratulations! You have successfully connected the water supply to your toilet.
Remember, if you encounter any difficulties or are unsure about any step, it’s always a good idea to consult a professional plumber. They have the expertise and knowledge to guide you through the process and ensure everything is done correctly.
VII. Step 5: Checking for Leaks and Finishing Up
After successfully installing or replacing a toilet tank, it is important to check for leaks and ensure that everything is properly sealed. Follow these steps to complete the installation process:
1. Turn on the Water Supply
Before checking for leaks, turn on the water supply to the toilet tank. Locate the shut-off valve, usually located near the base of the toilet, and turn it counterclockwise to open the valve. This will allow water to flow into the tank.
2. Inspect the Connections
Visually inspect all the connections, including the water supply line, fill valve, and flush valve. Look for any signs of water leakage, such as dripping or pooling water. If you notice any leaks, tighten the connections using a wrench or adjustable pliers. Ensure that all connections are secure and watertight.
3. Check the Flush Mechanism
Flush the toilet to check the functionality of the flush mechanism. Ensure that the flush lever is properly connected to the flush valve and that it operates smoothly. If there are any issues with the flush mechanism, adjust or replace the components as necessary.
4. Test the Fill Valve
Observe the fill valve as the tank refills after flushing. The fill valve should stop filling the tank once the water level reaches the appropriate level, usually indicated by a marked line on the inside of the tank. If the fill valve continues to fill the tank, adjust the float or replace the fill valve if needed.
5. Inspect for Leaks
After the tank has filled, carefully inspect the entire toilet, including the base, tank, and connections, for any signs of leaks. Look for water pooling, dampness, or discoloration. If you detect any leaks, identify the source and address the issue accordingly. This may involve tightening connections, replacing faulty components, or resealing areas with silicone caulk.
6. Clean Up
Once you have confirmed that there are no leaks and everything is functioning properly, clean up any excess water or debris. Wipe down the toilet tank and surrounding areas with a clean cloth. Dispose of any packaging materials or old parts appropriately.
7. Enjoy Your Newly Installed or Replaced Toilet Tank
Congratulations! You have successfully installed or replaced a toilet tank. Take a moment to appreciate your accomplishment and enjoy the convenience of a fully functional toilet. Remember to properly maintain your toilet by regularly cleaning and inspecting it to prevent any future issues.
By following these steps and checking for leaks, you can ensure that your toilet tank installation or replacement is completed correctly and without any issues. Enjoy the peace of mind that comes with a properly functioning toilet.
VIII. Frequently Asked Questions (FAQs) about Installing/Replacing a Toilet Tank
Here are some commonly asked questions about installing or replacing a toilet tank:
1. How do I know if I need to replace my toilet tank?
If your toilet tank is leaking, cracked, or damaged beyond repair, it’s time to replace it. Signs of a faulty toilet tank include constant running water, water pooling around the base, or visible cracks.
2. Can I install a new toilet tank myself?
Yes, installing a new toilet tank can be a DIY project if you have some basic plumbing skills. However, if you’re unsure or uncomfortable with the process, it’s always best to hire a professional plumber to ensure the job is done correctly.
3. What tools do I need to install a toilet tank?
The tools you’ll need may vary depending on the specific toilet tank model, but some common tools include an adjustable wrench, a screwdriver, a putty knife, and a hacksaw. It’s also a good idea to have a bucket and some rags on hand to catch any water spills.
4. How long does it take to install a toilet tank?
The time it takes to install a toilet tank can vary depending on your level of experience and the complexity of the installation. On average, it can take anywhere from 1 to 3 hours to complete the installation process.
5. Do I need to shut off the water supply before installing a new toilet tank?
Yes, it’s important to shut off the water supply to the toilet before installing a new tank. This can usually be done by turning the shut-off valve located near the base of the toilet clockwise until it stops. Make sure to flush the toilet to drain any remaining water in the tank before proceeding with the installation.
6. Can I reuse the existing toilet bowl when replacing the tank?
In most cases, you can reuse the existing toilet bowl when replacing the tank. However, it’s important to ensure that the bowl and tank are compatible and that the seals are in good condition. If there are any issues or concerns, it’s best to consult a professional plumber.
7. How do I properly seal the toilet tank to prevent leaks?
To prevent leaks, it’s important to properly seal the toilet tank to the bowl. This can be done by placing a new wax ring or a rubber gasket between the tank and the bowl. Make sure to tighten the bolts evenly to create a secure and watertight seal.
8. Are there any safety precautions I should take when installing a toilet tank?
When installing a toilet tank, it’s important to take some safety precautions. Make sure to wear protective gloves and eyewear to prevent any injuries. Additionally, always follow the manufacturer’s instructions and guidelines to ensure a safe and successful installation.
9. Can I replace a toilet tank without removing the entire toilet?
Yes, it is possible to replace a toilet tank without removing the entire toilet. This is known as a tank-only replacement. However, it’s important to note that this method may not be suitable for all toilet models, and it’s best to consult a professional plumber if you’re unsure.
10. How often should I replace my toilet tank?
The lifespan of a toilet tank can vary depending on factors such as usage, maintenance, and the quality of the tank. On average, a well-maintained toilet tank can last anywhere from 10 to 20 years. However, if you notice any signs of damage or leaks, it’s best to replace it sooner rather than later.
Remember, if you have any specific concerns or questions about installing or replacing a toilet tank, it’s always best to consult a professional plumber or refer to the manufacturer’s instructions for your specific model.

Michael Rasmussen is an accomplished writer with a passion for creating engaging content. Born and raised in a small town in Denmark, Michael developed a love for storytelling from a young age. He pursued his education at the prestigious Aarhus University, where he obtained a Bachelor’s degree in Literature and Creative Writing. With a unique perspective on life, Michael’s writing often delves into the intricacies of everyday experiences, including his quirky fascination with toilets. His ability to blend humor and insight has garnered him a loyal following of readers who appreciate his distinctive style. When he’s not busy crafting captivating narratives, Michael enjoys exploring the great outdoors and seeking inspiration in unexpected places.