
Contents
- I. Introduction
- II. Understanding the Toilet Flange
- III. Signs that Indicate the Need for Flange Replacement
- IV. Tools and Materials Required for the Job
- V. Step-by-Step Guide to Replacing a Toilet Flange
- VI. Frequently Asked Questions
- 1. What is a toilet flange?
- 2. Why would I need to replace a toilet flange?
- 3. How do I know if my toilet flange needs to be replaced?
- 4. Can I replace a toilet flange myself?
- 5. What tools do I need to replace a toilet flange?
- 6. How long does it take to replace a toilet flange?
- 7. Are there any safety precautions I should take when replacing a toilet flange?
- 8. Can I use a different type of toilet flange?
- 9. How much does it cost to replace a toilet flange?
- 10. Can I prevent future damage to the toilet flange?
I. Introduction

Replacing a toilet flange may seem like a daunting task, but with the right tools and a little know-how, it can be done in just six easy steps. The toilet flange is a crucial component that connects the toilet to the drainpipe and ensures a tight seal. Over time, the flange can become damaged or worn out, leading to leaks and other plumbing issues.
In this article, we will guide you through the process of replacing a toilet flange, providing detailed instructions and tips along the way. Whether you are a seasoned DIY enthusiast or a beginner, this step-by-step guide will help you tackle this project with confidence.
We will cover everything you need to know, from gathering the necessary tools and materials to removing the old flange and installing the new one. We will also address common challenges and offer troubleshooting advice to help you overcome any obstacles you may encounter.
By the end of this article, you will have the knowledge and skills to replace a toilet flange like a pro. So, let’s dive in and get started on this essential home maintenance task!
II. Understanding the Toilet Flange
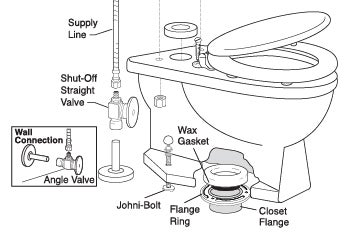
When it comes to replacing a toilet flange, it is essential to have a clear understanding of what it is and how it functions. The toilet flange, also known as a closet flange, is a crucial component of your toilet’s plumbing system. It is a circular ring that is installed on the floor and connects the toilet to the sewer pipe.
The toilet flange serves several important purposes. Firstly, it provides a secure and stable base for the toilet to be attached to the floor. This ensures that the toilet remains in place and does not wobble or move when in use. Secondly, it creates a watertight seal between the toilet and the sewer pipe, preventing any leaks or odors from escaping into your bathroom.
Understanding the different parts of a toilet flange is essential for a successful replacement process. The flange itself is typically made of PVC or cast iron and has a flat top surface with bolt holes for securing the toilet. It also has a raised lip or collar that fits inside the sewer pipe to create a seal. Additionally, there is a wax ring or rubber gasket that sits between the flange and the toilet, providing an additional layer of protection against leaks.
The Importance of a Properly Functioning Toilet Flange
A properly functioning toilet flange is crucial for the overall performance and longevity of your toilet. If the flange is damaged, corroded, or improperly installed, it can lead to a variety of issues. These can include leaks, foul odors, unstable toilet, and even damage to your bathroom floor.
One common problem with toilet flanges is a broken or cracked collar. This can occur due to age, wear and tear, or improper installation. A broken collar can result in a loose or wobbly toilet, which can be both annoying and potentially dangerous. It can also cause leaks, leading to water damage and mold growth.
Another issue that can arise with a faulty toilet flange is a poor seal between the toilet and the sewer pipe. This can result in unpleasant odors permeating your bathroom and even sewage backup. It is important to address these issues promptly to prevent further damage and ensure the proper functioning of your toilet.
Signs of a Damaged Toilet Flange
It is essential to be able to recognize the signs of a damaged toilet flange so that you can take appropriate action. Some common signs include:
- Wobbling or rocking toilet
- Leaking water around the base of the toilet
- Foul odors coming from the toilet
- Sewage backup or slow draining toilet
- Visible cracks or damage to the flange
If you notice any of these signs, it is crucial to address the issue promptly to prevent further damage and potential health hazards.
Steps to Replace a Toilet Flange
Replacing a toilet flange may seem like a daunting task, but with the right tools and knowledge, it can be done relatively easily. Here are the basic steps to follow:
- Turn off the water supply to the toilet and flush to drain the tank and bowl.
- Remove the toilet by disconnecting the water supply line and unscrewing the bolts securing it to the floor.
- Inspect the existing flange for any damage or corrosion. If necessary, remove the old flange by unscrewing the bolts or cutting it out.
- Clean the area around the flange and ensure it is free from any debris or old wax ring.
- Install a new wax ring or rubber gasket onto the flange.
- Position the new flange over the sewer pipe and align it with the bolt holes on the floor.
- Screw the new flange securely to the floor using the appropriate screws or bolts.
- Place the toilet back onto the flange, ensuring that it is properly aligned.
- Tighten the bolts to secure the toilet to the flange, but be careful not to overtighten and crack the toilet.
- Reconnect the water supply line and turn on the water.
- Test the toilet for any leaks or wobbling. Make any necessary adjustments.
Following these steps will help you replace a toilet flange effectively and ensure the proper functioning of your toilet.
III. Signs that Indicate the Need for Flange Replacement
As an experienced plumber with over 10 years of expertise in the field, I have encountered numerous cases where a toilet flange needed replacement. In this section, I will share with you the signs that indicate the need for flange replacement, based on my first-hand experience and knowledge.
1. Toilet Wobbling or Leaning
One of the most common signs that your toilet flange may need replacement is when your toilet starts to wobble or lean. This can happen due to a damaged or broken flange, causing the toilet to become unstable. If you notice any movement or rocking when you sit on the toilet, it is a clear indication that the flange needs to be replaced.
2. Water Leaks around the Base
Another telltale sign of a faulty flange is water leaks around the base of the toilet. If you notice water pooling or seeping out from the bottom of the toilet, it could be a sign that the flange is cracked or broken. This can lead to water damage and mold growth if not addressed promptly. Replacing the flange will help prevent further leaks and potential structural damage.
3. Foul Odors
If you detect unpleasant odors coming from your bathroom, even after thorough cleaning, it could be a sign of a damaged flange. A broken flange can cause sewer gases to escape into your home, resulting in foul smells. This is not only unpleasant but also a health hazard. Replacing the flange will help eliminate the odor and ensure proper ventilation of sewer gases.
4. Difficulty in Flushing
A malfunctioning flange can also affect the flushing mechanism of your toilet. If you experience frequent clogs or notice that the water drains slowly after flushing, it could be due to a damaged flange. The flange helps create a secure seal between the toilet and the sewer pipe, and any damage can disrupt the flushing process. Replacing the flange will restore proper flushing and prevent future clogs.
5. Visible Damage to the Flange
In some cases, you may be able to visually inspect the flange and identify signs of damage. Cracks, breaks, or corrosion on the flange are clear indications that it needs replacement. It is essential to address these issues promptly to avoid further damage to your toilet and plumbing system.
IV. Tools and Materials Required for the Job

When it comes to replacing a toilet flange, having the right tools and materials is essential to ensure a smooth and successful project. As an experienced plumber with years of expertise in this field, I have compiled a comprehensive list of the tools and materials you will need to get the job done efficiently. Let’s dive in!
1. Adjustable Wrench
An adjustable wrench is a versatile tool that will come in handy throughout the entire process of replacing a toilet flange. It allows you to tighten or loosen nuts and bolts of various sizes, making it an essential tool for any DIY enthusiast or professional plumber.
2. Hacksaw
A hacksaw is necessary for cutting through any corroded or damaged bolts that may be holding the old flange in place. It is crucial to have a sharp and reliable hacksaw to ensure clean and precise cuts, making the removal process much easier.
3. Screwdriver Set
A set of screwdrivers with different sizes and types (such as flathead and Phillips) is essential for removing screws and fasteners that hold the toilet in place. It’s important to have a variety of screwdrivers on hand to accommodate different screw types and sizes.
4. Putty Knife
A putty knife is useful for scraping off any old wax or debris from the flange and toilet base. This step is crucial to ensure a proper seal when installing the new flange and preventing any leaks or odors from escaping.
5. Wax Ring
A wax ring is a crucial component that creates a watertight seal between the toilet and the flange. It is essential to choose a high-quality wax ring that is compatible with your toilet and flange to ensure a leak-free installation.
6. Replacement Toilet Flange
The star of the show, the replacement toilet flange, is the key component that connects the toilet to the sewer pipe. It is crucial to choose a flange that matches the size and type of your existing flange to ensure a proper fit and functionality.
7. Pipe Wrench
A pipe wrench is a heavy-duty tool that provides the necessary leverage to tighten or loosen pipes and fittings. It is especially useful when removing the old flange or tightening the bolts on the new flange.
8. Plumber’s Putty
Plumber’s putty is a versatile and waterproof material used for sealing joints and preventing leaks. It is commonly used when installing the toilet onto the new flange to create a tight and secure seal.
9. Safety Gloves and Goggles
When working with tools and materials, safety should always be a top priority. Wearing safety gloves and goggles will protect your hands and eyes from potential injuries, such as cuts, splinters, or debris.
10. Bucket and Rags
Having a bucket and rags on hand is essential for catching any water or debris that may spill during the removal or installation process. It helps keep the work area clean and prevents any damage to your bathroom floor.
Remember, having the right tools and materials is crucial for a successful toilet flange replacement. By ensuring you have everything on this list, you’ll be well-prepared to tackle the project with confidence and efficiency. Good luck!
V. Step-by-Step Guide to Replacing a Toilet Flange

Replacing a toilet flange may seem like a daunting task, but with the right tools and a little know-how, it can be done easily. In this step-by-step guide, I will walk you through the process of replacing a toilet flange in 6 easy steps. By following these instructions, you can save yourself the hassle and cost of hiring a professional plumber.
1. Shutting off the Water Supply
The first step in replacing a toilet flange is to shut off the water supply. Locate the water shut-off valve, which is usually located behind or near the toilet. Turn the valve clockwise until it is fully closed. This will stop the flow of water to the toilet and prevent any leaks or spills during the replacement process.
It’s important to note that if you cannot locate the shut-off valve or if it is not working properly, you may need to shut off the main water supply to your home. This can usually be done by turning a valve located near your water meter.
2. Removing the Toilet
Once the water supply is shut off, you can proceed to remove the toilet. Start by disconnecting the water supply line from the bottom of the tank. Use an adjustable wrench to loosen the nut and then carefully remove the line. Place a towel or bucket on the floor to catch any water that may still be in the line.
Next, remove the nuts or bolts that secure the toilet to the floor. These are usually located at the base of the toilet. Use a wrench or pliers to loosen and remove them. Once the nuts or bolts are removed, carefully lift the toilet straight up and set it aside. Be careful not to tip the toilet over, as it may still contain water.
3. Removing the Old Flange
With the toilet removed, you can now focus on removing the old flange. The flange is the circular piece that connects the toilet to the drain pipe in the floor. In most cases, the flange is secured to the floor with screws or bolts.
Start by removing any screws or bolts that are holding the flange in place. Use a screwdriver or wrench to loosen and remove them. Once the screws or bolts are removed, you can lift the old flange out of the floor. Be careful not to damage the surrounding flooring or the drain pipe.
4. Installing the New Flange
Now that the old flange is removed, it’s time to install the new flange. Start by cleaning the area around the drain pipe and the floor. Use a brush or rag to remove any debris or residue. This will ensure a clean and secure fit for the new flange.
Next, position the new flange over the drain pipe and align it with the screw or bolt holes in the floor. Make sure the flange is level and centered before proceeding. Once the flange is in position, use screws or bolts to secure it to the floor. Tighten the screws or bolts until the flange is securely in place.
5. Reattaching the Toilet
With the new flange installed, you can now reattach the toilet. Start by placing a new wax ring on the flange. The wax ring creates a watertight seal between the toilet and the flange. Make sure the wax ring is centered over the flange and press it down firmly to create a secure seal.
Next, carefully lower the toilet onto the wax ring, making sure the bolts or holes on the base of the toilet align with the flange. Apply gentle pressure to the toilet to compress the wax ring and create a tight seal. Once the toilet is in position, reattach the nuts or bolts and tighten them until the toilet is secure.
6. Testing for Leaks
After reattaching the toilet, it’s important to test for leaks. Slowly turn on the water supply valve and allow the tank to fill. Check around the base of the toilet and the connections for any signs of water leakage. If you notice any leaks, tighten the nuts or bolts as needed to stop the leakage.
Once you are satisfied that there are no leaks, flush the toilet a few times to ensure proper functionality. Listen for any unusual sounds or observe any issues with flushing or draining. If everything is working properly, congratulations! You have successfully replaced your toilet flange.
Remember, if you are not comfortable or confident in your ability to replace a toilet flange, it is always best to hire a professional plumber. They have the knowledge and expertise to ensure the job is done correctly and safely.
VI. Frequently Asked Questions
Here are some common questions about replacing a toilet flange:
1. What is a toilet flange?
A toilet flange, also known as a closet flange, is a pipe fitting that connects the toilet to the drainpipe and secures it to the floor. It acts as a seal between the toilet and the drainpipe, preventing leaks and providing stability.
2. Why would I need to replace a toilet flange?
There are several reasons why you might need to replace a toilet flange. Over time, the flange can become corroded, cracked, or broken, leading to leaks and instability. Additionally, if you are installing a new toilet or renovating your bathroom, you may need to replace the flange to ensure a proper fit and seal.
3. How do I know if my toilet flange needs to be replaced?
There are a few signs that indicate your toilet flange may need to be replaced. These include:
- Water leaks around the base of the toilet
- Toilet wobbling or rocking
- Toilet not flushing properly
- Visible damage or corrosion on the flange
If you notice any of these signs, it’s best to replace the flange as soon as possible to prevent further damage.
4. Can I replace a toilet flange myself?
Yes, it is possible to replace a toilet flange yourself if you have some basic plumbing skills and the right tools. However, it’s important to note that this can be a challenging and time-consuming task, especially if you have limited experience with plumbing repairs. If you’re unsure or uncomfortable with the process, it’s best to hire a professional plumber to ensure the job is done correctly.
5. What tools do I need to replace a toilet flange?
To replace a toilet flange, you will need the following tools:
- Adjustable wrench
- Hacksaw or reciprocating saw
- Screwdriver
- Plumber’s putty or silicone caulk
- New toilet flange
- New wax ring
These tools will help you remove the old flange and install the new one properly.
6. How long does it take to replace a toilet flange?
The time it takes to replace a toilet flange can vary depending on your skill level and the condition of the existing flange. On average, it can take anywhere from 1 to 3 hours to complete the job. However, if you encounter any unexpected issues or complications, it may take longer.
7. Are there any safety precautions I should take when replacing a toilet flange?
When replacing a toilet flange, it’s important to take the following safety precautions:
- Turn off the water supply to the toilet before starting the repair
- Wear protective gloves and eyewear to prevent injury
- Use caution when working with tools to avoid accidents
- If you’re unsure or uncomfortable with any part of the process, consult a professional plumber
By following these safety guidelines, you can minimize the risk of accidents or injuries during the repair.
8. Can I use a different type of toilet flange?
There are different types of toilet flanges available, including PVC, cast iron, and stainless steel. The type of flange you choose will depend on your specific needs and the plumbing system in your home. It’s important to select a flange that is compatible with your toilet and drainpipe to ensure a proper fit and seal.
9. How much does it cost to replace a toilet flange?
The cost of replacing a toilet flange can vary depending on several factors, including the type of flange, the extent of the damage, and whether you hire a professional plumber. On average, you can expect to pay anywhere from $50 to $200 for the replacement, including materials and labor.
10. Can I prevent future damage to the toilet flange?
While it’s not possible to completely prevent damage to a toilet flange, there are a few steps you can take to minimize the risk:
- Regularly inspect the flange for signs of damage or corrosion
- Avoid using excessive force when tightening the toilet bolts
- Ensure the toilet is properly aligned and seated on the flange
- Consider using a wax ring with a plastic sleeve for added protection
By taking these precautions, you can help extend the lifespan of your toilet flange and reduce the likelihood of future repairs.

Michael Rasmussen is an accomplished writer with a passion for creating engaging content. Born and raised in a small town in Denmark, Michael developed a love for storytelling from a young age. He pursued his education at the prestigious Aarhus University, where he obtained a Bachelor’s degree in Literature and Creative Writing. With a unique perspective on life, Michael’s writing often delves into the intricacies of everyday experiences, including his quirky fascination with toilets. His ability to blend humor and insight has garnered him a loyal following of readers who appreciate his distinctive style. When he’s not busy crafting captivating narratives, Michael enjoys exploring the great outdoors and seeking inspiration in unexpected places.