
Contents
- I. Introduction to Toilet Flappers
- II. Understanding the Mechanism of Toilet Flappers
- III. Different Sizes of Toilet Flappers
- IV. Common Problems with Toilet Flappers
- V. Steps for Replacing a Toilet Flapper
- VI. Frequently Asked Questions about Toilet Flappers
- 1. What is a toilet flapper?
- 2. How does a toilet flapper work?
- 3. What are the common problems with toilet flappers?
- 4. How do I know if my toilet flapper needs replacement?
- 5. How often should I replace my toilet flapper?
- 6. Can I replace the toilet flapper myself?
- 7. Are all toilet flappers the same size?
- 8. Can I use any brand of toilet flapper for my toilet?
- 9. How much does a toilet flapper cost?
- 10. Are there any maintenance tips for prolonging the lifespan of a toilet flapper?
I. Introduction to Toilet Flappers

When it comes to the functionality of a toilet, one crucial component that often goes unnoticed is the toilet flapper. The toilet flapper is a small, but essential part of the toilet tank that plays a significant role in the flushing process. It is responsible for controlling the flow of water from the tank to the bowl, ensuring a proper and efficient flush.
So, how does a toilet flapper work? When you press the flush handle, it lifts the flapper, allowing water to rush from the tank into the bowl. This sudden rush of water creates a powerful suction force that removes waste from the bowl and sends it down the drain. Once the tank is empty, the flapper falls back into place, sealing the tank and stopping the water flow.
Toilet flappers come in various sizes to fit different toilet models. It is important to choose the right size flapper for your toilet to ensure a proper seal and prevent water leakage. A worn-out or damaged flapper can lead to water wastage and frequent toilet repairs. Regular inspection and replacement of the flapper is necessary to maintain the efficiency of your toilet.
Common problems associated with toilet flappers include leaks, improper sealing, and ghost flushing. Leaks can occur when the flapper doesn’t seal tightly, causing water to continuously flow from the tank to the bowl. Improper sealing can result in weak flushes or incomplete flushing. Ghost flushing, on the other hand, happens when the flapper randomly opens and closes, causing the toilet to flush by itself.
II. Understanding the Mechanism of Toilet Flappers

As an experienced plumber with a deep understanding of toilet mechanisms, I have encountered countless issues with toilet flappers. In this section, I will explain the inner workings of toilet flappers, shedding light on their importance and how they function.
The Role of Toilet Flappers
Toilet flappers play a crucial role in the flushing process. When you press the flush handle, it lifts the flapper, allowing water to flow from the tank into the bowl. This sudden rush of water creates a siphon effect, effectively removing waste from the bowl and sending it down the drain.
Once the flushing is complete, the flapper falls back into place, sealing the tank and preventing any water from escaping. This ensures that the tank refills with water, ready for the next flush.
Components of a Toilet Flapper
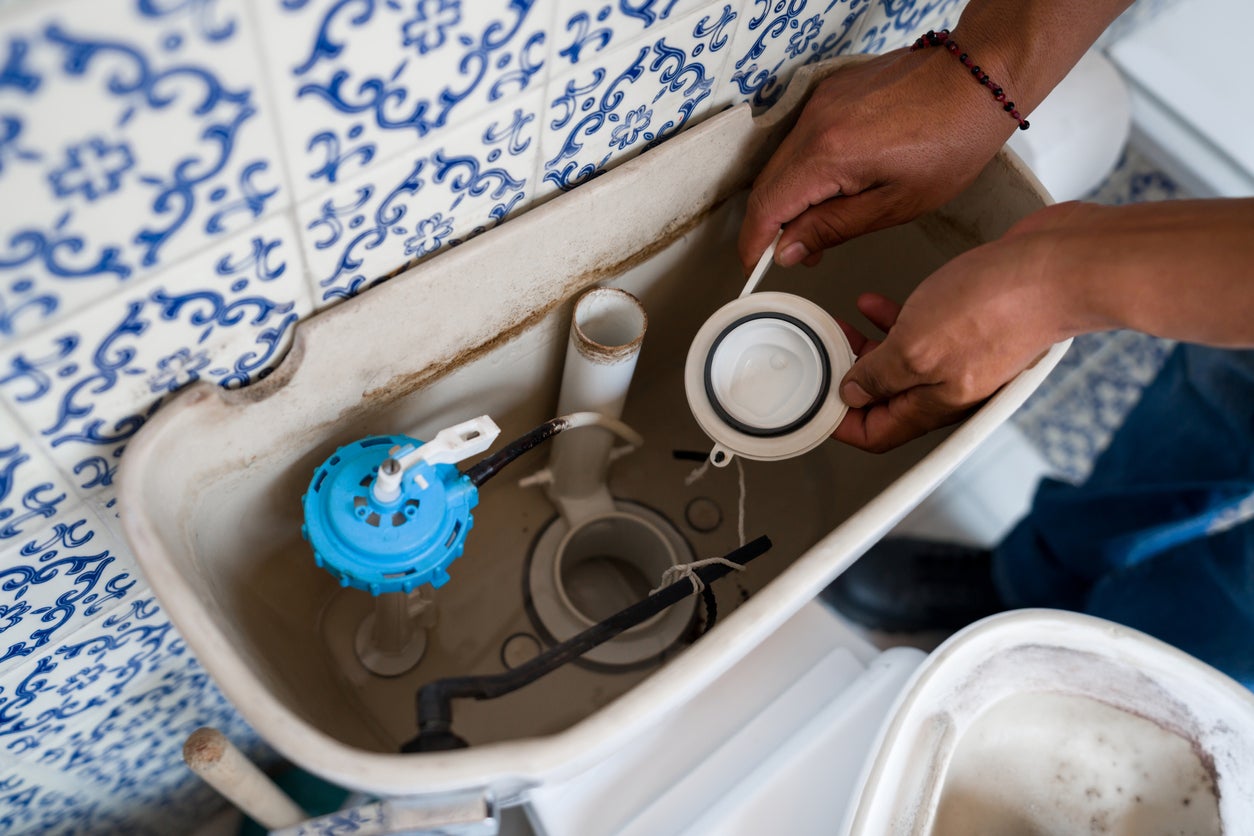
A toilet flapper consists of several components that work together to ensure proper functioning. The main parts include:
- Flapper Valve: This is the rubber or plastic disc that covers the flush valve opening. It is attached to the flush lever by a chain or rod.
- Chain or Rod: The chain or rod connects the flapper valve to the flush lever. When the flush lever is pressed, it lifts the flapper valve, initiating the flushing process.
- Flush Valve: The flush valve is the opening at the bottom of the tank that allows water to flow into the bowl during flushing.
- Overflow Tube: The overflow tube prevents the tank from overflowing by diverting excess water into the bowl.
Common Problems with Toilet Flappers
While toilet flappers are designed to be durable, they can develop issues over time. Some common problems include:
- Leaking: A worn or damaged flapper valve can cause water to continuously leak from the tank into the bowl. This not only wastes water but also leads to higher water bills.
- Running Toilet: A running toilet occurs when the flapper fails to seal properly, allowing water to continuously flow from the tank into the bowl. This can be caused by a misaligned flapper or a chain that is too tight or too loose.
- Flapper Sticking: Sometimes, the flapper may stick in the open position, preventing the tank from refilling properly after flushing. This can be due to mineral deposits or a chain that is tangled or caught on another component.
Replacing a Toilet Flapper
If you encounter any of the aforementioned problems with your toilet flapper, it may be necessary to replace it. Here are the steps to follow:
- Turn off the water supply to the toilet by closing the shut-off valve located behind the toilet.
- Flush the toilet to drain the water from the tank.
- Remove the chain or rod connecting the flapper valve to the flush lever.
- Detach the old flapper valve from the flush valve.
- Install the new flapper valve onto the flush valve, ensuring a secure fit.
- Reattach the chain or rod to the flush lever, allowing proper movement of the flapper valve.
- Turn on the water supply and allow the tank to refill.
- Test the new flapper valve by flushing the toilet and ensuring it seals properly.
It’s important to note that different toilets may require specific flapper sizes and designs. Consult the manufacturer’s instructions or seek professional advice if you are unsure about the correct replacement flapper for your toilet model.
Understanding the mechanism of toilet flappers is essential for maintaining a properly functioning toilet. By being aware of the components, common problems, and replacement process, you can effectively troubleshoot and resolve any issues that may arise. Remember, a well-maintained toilet flapper ensures efficient flushing and helps conserve water.
III. Different Sizes of Toilet Flappers

When it comes to toilet flappers, one size does not fit all. These essential components of a toilet tank come in various sizes to accommodate different types of toilets and their specific flushing mechanisms. In this section, we will explore the different sizes of toilet flappers and how to determine the right size for your toilet.
1. Standard Size Flappers
The most common size of toilet flappers is the standard size, which fits the majority of toilets. These flappers typically have a diameter of 2 inches and are compatible with gravity-fed toilets. If you have a standard gravity-fed toilet, chances are that a standard size flapper will work perfectly fine for you.
Standard size flappers are widely available and can be easily found at most hardware stores or online retailers. They are also relatively affordable, making them a popular choice for homeowners looking to replace a worn-out or malfunctioning flapper.
2. Oversized Flappers
In some cases, toilets may require an oversized flapper. These flappers have a larger diameter, usually around 3 inches, and are designed to fit toilets with a larger flush valve opening. Oversized flappers are commonly found in older toilets or toilets with a non-standard flush valve size.
If you have an older toilet or a toilet with a larger flush valve opening, it is important to measure the diameter of the flush valve before purchasing a replacement flapper. This will ensure that you get the correct size and prevent any issues with the flapper not sealing properly or causing leaks.
3. Adjustable Flappers
For toilets with non-standard flush valve sizes or for those who are unsure of the exact size needed, adjustable flappers offer a convenient solution. These flappers feature an adjustable design that allows you to customize the size to fit your specific toilet.
Adjustable flappers typically have a range of sizes, such as 2 to 3 inches, and can be easily adjusted by trimming the excess material with a pair of scissors. This versatility makes adjustable flappers a popular choice for homeowners who want a hassle-free replacement option.
4. Specialty Flappers
In addition to the standard, oversized, and adjustable flappers, there are also specialty flappers available for specific toilet models or brands. These flappers are designed to meet the unique requirements of certain toilets and may not be compatible with other models.
If you have a specialty toilet or a toilet from a specific brand, it is recommended to consult the manufacturer’s guidelines or contact their customer support to determine the appropriate flapper size for your toilet. Using the wrong flapper can result in poor flushing performance or potential damage to the toilet.
It is important to note that while the size of the flapper is crucial for proper functioning, other factors such as the material, shape, and quality of the flapper also play a significant role. It is advisable to choose a flapper made of durable materials like rubber or silicone for longevity and optimal performance.
IV. Common Problems with Toilet Flappers
As an experienced plumber with over 10 years of expertise in the field, I have encountered numerous issues with toilet flappers throughout my career. In this section, I will discuss some of the most common problems that homeowners may face with their toilet flappers and provide practical solutions to resolve these issues.
1. Flapper Leakage
One of the primary problems that homeowners often encounter with toilet flappers is leakage. This can lead to a constant running toilet, wasting water and increasing utility bills. Flapper leakage can occur due to various reasons, such as a worn-out flapper valve, mineral deposits, or improper installation.
To fix flapper leakage, start by inspecting the flapper valve for any signs of wear and tear. If the flapper appears damaged or cracked, it is essential to replace it with a new one. Additionally, check for mineral deposits on the flapper or the flush valve seat. If present, clean them using a mixture of vinegar and water or a mild descaling solution. Finally, ensure that the flapper is properly aligned and securely attached to the flush valve.
2. Incomplete Flushing
Another common issue with toilet flappers is incomplete flushing, where the flapper fails to lift completely, resulting in inadequate water flow and inefficient flushing. This can lead to clogs and unsanitary conditions in the toilet bowl.
To address incomplete flushing, first, check the chain length connecting the flapper to the flush handle. If the chain is too short, it may prevent the flapper from lifting fully. Adjust the chain length to ensure proper movement of the flapper. Additionally, inspect the flush handle mechanism for any obstructions or misalignments. If necessary, clean or replace the handle to ensure smooth operation.
3. Flapper Sticking or Closing Too Quickly
Flapper sticking or closing too quickly is another common problem that can disrupt the flushing process. This issue can occur due to mineral buildup, debris accumulation, or a misaligned flapper.
To resolve flapper sticking or premature closing, start by cleaning the flapper and the flush valve seat thoroughly. Remove any mineral deposits or debris that may be causing the issue. If the problem persists, check the chain length connecting the flapper to the flush handle. An excessively long chain can cause the flapper to close too quickly. Adjust the chain length accordingly. Finally, ensure that the flapper is properly aligned and seated on the flush valve to prevent sticking.
4. Flapper Chain Getting Tangled
Many homeowners often face the frustrating problem of the flapper chain getting tangled or caught between other components within the toilet tank. This can prevent the flapper from functioning correctly and result in a malfunctioning toilet.
To prevent the flapper chain from getting tangled, ensure that the chain is of the appropriate length. A chain that is too long is more likely to get caught or tangled. Adjust the chain length to provide enough slack for smooth movement of the flapper without excessive slack that may lead to tangling. Additionally, make sure that the chain is properly attached to both the flapper and the flush handle, allowing for unrestricted movement.
5. Flapper Not Sealing Properly
A flapper that fails to seal properly can cause water to continuously leak from the toilet tank into the bowl. This can lead to water wastage and an increased water bill.
To address a flapper that does not seal properly, first, inspect the flapper for any signs of damage or deterioration. If the flapper appears worn out, it is crucial to replace it with a new one. Additionally, check the flush valve seat for any mineral deposits or debris that may prevent a tight seal. Clean the flush valve seat thoroughly using a descaling solution or vinegar and water mixture. Finally, ensure that the flapper is properly aligned and seated on the flush valve to create an effective seal.
By understanding and addressing these common problems with toilet flappers, homeowners can ensure the proper functioning of their toilets and avoid unnecessary water wastage. Regular maintenance and timely repairs are key to maintaining a well-functioning toilet system.
V. Steps for Replacing a Toilet Flapper
Replacing a toilet flapper is a relatively simple task that can be done by anyone with basic DIY skills. Follow these steps to replace a toilet flapper:
Step 1: Gather the necessary tools and materials
Before you begin, make sure you have all the tools and materials you need. This includes a new toilet flapper, a wrench or pliers, a sponge or towel, and a bucket or container to catch any water that may spill.
Step 2: Turn off the water supply
Locate the water shut-off valve behind the toilet and turn it clockwise to shut off the water supply. Flush the toilet to drain any remaining water from the tank.
Step 3: Remove the old flapper
Open the toilet tank lid and locate the flapper. The flapper is a rubber or plastic disk that covers the flush valve opening. Disconnect the chain or strap that connects the flapper to the flush handle. Remove the flapper from the flush valve, taking note of how it is attached.
Step 4: Install the new flapper
Take the new flapper and attach it to the flush valve in the same way the old flapper was attached. Make sure it is securely in place. Reconnect the chain or strap to the flush handle, ensuring there is enough slack for the flapper to open and close properly.
Step 5: Turn on the water supply
Turn the water supply valve counterclockwise to turn on the water. Allow the tank to fill up and check for any leaks around the flapper. If there are any leaks, adjust the chain or strap to ensure a proper seal.
Step 6: Test the flush
Flush the toilet to test the new flapper. The flapper should open and close smoothly, allowing water to flow into the bowl and then stopping the flow once the tank is full. If the flapper does not function properly, make any necessary adjustments or consider replacing it with a different flapper.
By following these steps, you can easily replace a toilet flapper and ensure that your toilet is functioning properly. Remember to turn off the water supply before starting the replacement process and test the flush afterwards to check for any issues. With a new flapper in place, you can prevent water wastage and keep your toilet running efficiently.
VI. Frequently Asked Questions about Toilet Flappers
As an experienced plumber with over 10 years of expertise in the field, I have encountered numerous questions about toilet flappers. In this section, I will address some of the most frequently asked questions to help you better understand this essential component of your toilet system.
1. What is a toilet flapper?
A toilet flapper is a rubber or silicone valve that controls the flow of water from the tank to the bowl when you flush. It is attached to a chain or rod and is responsible for sealing the flush valve opening to prevent water from continuously flowing into the bowl.
2. How does a toilet flapper work?
When you press the flush lever, it lifts the flapper, allowing water to flow from the tank into the bowl. Once the tank is empty, the flapper falls back into place, sealing the flush valve opening and stopping the water flow. This mechanism ensures that the tank refills and is ready for the next flush.
3. What are the common problems with toilet flappers?
There are several common problems that can occur with toilet flappers. These include:
- Leaking: If the flapper doesn’t seal properly, water can leak from the tank into the bowl, causing constant running water and increasing your water bill.
- Running toilet: A running toilet is often caused by a flapper that doesn’t close completely, allowing water to continuously flow into the bowl.
- Flapper deterioration: Over time, the flapper can deteriorate due to exposure to chemicals in cleaning products or mineral deposits in the water, leading to leaks or improper sealing.
- Chain or rod issues: The chain or rod that connects the flapper to the flush lever can become tangled, loose, or disconnected, affecting the flapper’s functionality.
4. How do I know if my toilet flapper needs replacement?
There are a few signs that indicate your toilet flapper may need replacement:
- Constant running water: If you hear water running in your toilet even when it hasn’t been flushed, it’s likely that the flapper is not sealing properly.
- Visible damage: Inspect the flapper for any cracks, tears, or warping. These are signs of deterioration and indicate the need for replacement.
- Water leaks: If you notice water pooling around the base of your toilet or hear a hissing sound, it could be due to a faulty flapper.
5. How often should I replace my toilet flapper?
The lifespan of a toilet flapper depends on various factors, such as water quality and usage. On average, it is recommended to replace the flapper every 5 to 7 years. However, if you notice any signs of damage or issues with the flapper, it’s best to replace it sooner to avoid further problems.
6. Can I replace the toilet flapper myself?
Yes, replacing a toilet flapper is a relatively simple DIY task that doesn’t require extensive plumbing knowledge. You can purchase a compatible flapper from your local hardware store and follow the manufacturer’s instructions for installation. However, if you’re unsure or uncomfortable with the process, it’s always best to consult a professional plumber.
7. Are all toilet flappers the same size?
No, toilet flappers come in different sizes to fit various toilet models. It’s important to choose a flapper that is compatible with your specific toilet brand and model. Refer to the toilet’s user manual or consult a plumber if you’re unsure about the correct flapper size.
8. Can I use any brand of toilet flapper for my toilet?
While there are universal flappers available, it’s generally recommended to use a flapper from the same brand as your toilet. Different brands may have slight variations in design and dimensions, and using a compatible flapper ensures proper fit and functionality.
9. How much does a toilet flapper cost?
The cost of a toilet flapper can vary depending on the brand, quality, and features. On average, a basic flapper can range from $5 to $15. However, specialty flappers with advanced features, such as water-saving capabilities, may be priced higher.
10. Are there any maintenance tips for prolonging the lifespan of a toilet flapper?
Yes, here are some maintenance tips to help prolong the lifespan of your toilet flapper:
- Avoid using harsh chemical cleaners that can damage the flapper.
- Regularly clean the flapper and flush valve to remove any mineral deposits or debris.
- Check the chain or rod connecting the flapper to the flush lever and ensure it is properly adjusted.
- Consider using a water softener if your water has high mineral content, as this can reduce the buildup of deposits on the flapper.
By addressing these frequently asked questions, I hope to have provided you with a comprehensive understanding of toilet flappers and their importance in maintaining a properly functioning toilet. If you have any further questions or concerns, feel free to reach out to me.

Michael Rasmussen is an accomplished writer with a passion for creating engaging content. Born and raised in a small town in Denmark, Michael developed a love for storytelling from a young age. He pursued his education at the prestigious Aarhus University, where he obtained a Bachelor’s degree in Literature and Creative Writing. With a unique perspective on life, Michael’s writing often delves into the intricacies of everyday experiences, including his quirky fascination with toilets. His ability to blend humor and insight has garnered him a loyal following of readers who appreciate his distinctive style. When he’s not busy crafting captivating narratives, Michael enjoys exploring the great outdoors and seeking inspiration in unexpected places.