
Contents
- I. Introduction to Toilet Replacement
- II. Assessing the Need for Toilet Replacement
- III. Choosing the Right Toilet for Your Home
- IV. Preparing for Toilet Replacement
- V. Tools and Materials Required for Toilet Replacement
- VI. Removing the Old Toilet
- VII. Installing the New Toilet
- VIII. Connecting the Water Supply
- IX. Testing the Newly Installed Toilet
I. Introduction to Toilet Replacement
Replacing a toilet may seem like a daunting task, but with the right knowledge and tools, it can be a straightforward process. Whether you’re looking to upgrade your bathroom or your toilet is malfunctioning, this step-by-step guide will walk you through the process of toilet replacement.
Before you begin, gather all the necessary tools and materials. You’ll need a new toilet, wax ring, adjustable wrench, screwdriver, plunger, and a bucket. It’s also a good idea to have some rags or towels on hand to clean up any spills.
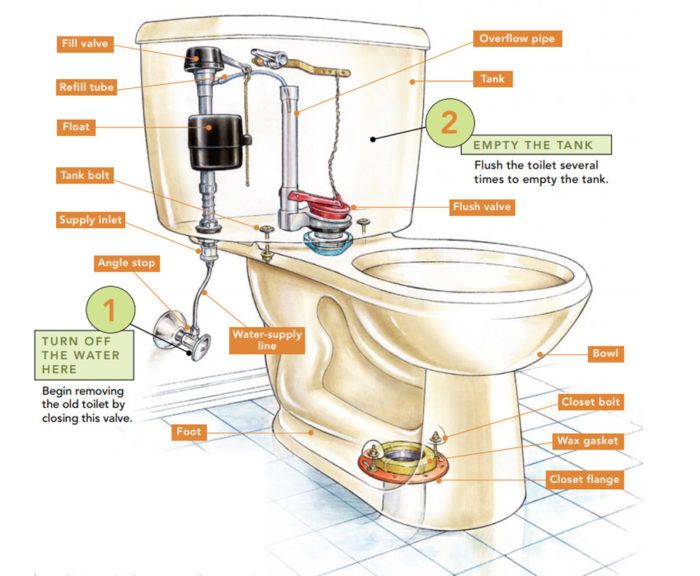
The first step is to turn off the water supply to the toilet. Locate the shut-off valve, usually located behind the toilet or in the basement, and turn it clockwise to shut off the water. Flush the toilet to drain any remaining water in the tank and bowl.
Next, disconnect the water supply line from the bottom of the tank. Use an adjustable wrench to loosen the nut and carefully remove the line. Place a bucket underneath to catch any water that may drip.
Now it’s time to remove the old toilet. Start by removing the caps covering the bolts at the base of the toilet. Use a screwdriver to loosen and remove the nuts. Carefully lift the toilet off the floor and set it aside.
With the old toilet removed, inspect the flange and remove any old wax residue. Place a new wax ring on the flange, ensuring it is centered and level. Carefully lower the new toilet onto the wax ring, aligning the bolts with the holes in the base.
Tighten the nuts onto the bolts, but be careful not to overtighten and crack the toilet. Reconnect the water supply line and turn on the water. Check for any leaks and make sure the toilet is securely in place.
Finally, test the toilet by flushing and checking for proper operation. If everything looks good, clean up any mess and dispose of the old toilet properly.
By following this step-by-step guide, you can successfully replace your toilet and enjoy a fully functioning bathroom. Remember to take your time, follow safety precautions, and don’t hesitate to seek professional help if needed.
II. Assessing the Need for Toilet Replacement
As an experienced plumber with over 10 years of expertise in the field, I have encountered numerous situations where homeowners were unsure whether they needed to replace their toilets. In this section, I will guide you through the process of assessing the need for toilet replacement, providing you with valuable insights and tips to help you make an informed decision.
1. Age and Condition of the Toilet
The first factor to consider when assessing the need for toilet replacement is the age and condition of your current toilet. Generally, toilets have a lifespan of around 15 to 25 years. If your toilet is approaching or exceeding this age range, it may be more prone to issues such as leaks, cracks, or inefficient flushing.
Inspect your toilet for any visible signs of wear and tear, such as cracks in the porcelain, rusted parts, or loose connections. Additionally, if you frequently experience clogs or have to constantly repair your toilet, it may be a sign that it’s time for a replacement.
2. Water Efficiency
In today’s environmentally conscious world, water efficiency is a crucial consideration when it comes to toilet replacement. Older toilets typically use a significant amount of water per flush, which can result in higher water bills and unnecessary water wastage.
Check if your toilet has a WaterSense label, which indicates that it meets the Environmental Protection Agency’s (EPA) water efficiency standards. If your toilet doesn’t have this label and was manufactured before 1994, it’s highly likely that it uses more water than necessary. Upgrading to a newer, water-efficient toilet can help you save both money and water in the long run.
3. Comfort and Accessibility
Another aspect to consider when assessing the need for toilet replacement is the comfort and accessibility of your current toilet. If you or any members of your household have mobility issues or disabilities, it may be beneficial to install a toilet that is specifically designed for accessibility.
Features such as higher seat heights, grab bars, and wider bowl openings can greatly enhance comfort and make it easier for individuals with limited mobility to use the toilet. Additionally, newer toilet models often offer improved ergonomics and comfort, making them a worthwhile upgrade for anyone seeking a more pleasant bathroom experience.
4. Style and Aesthetics
While not necessarily a functional consideration, the style and aesthetics of your toilet can play a significant role in your overall bathroom design. If you’re planning a bathroom renovation or simply want to update the look of your space, replacing your toilet can be a great way to achieve the desired aesthetic.
Consider the design, color, and shape of your current toilet and determine whether it aligns with your personal preferences and the overall theme of your bathroom. With a wide range of options available in the market, you can choose a toilet that not only functions well but also enhances the visual appeal of your bathroom.
5. Professional Advice
If you’re still unsure whether you need to replace your toilet after considering the factors mentioned above, it’s always a good idea to seek professional advice. A qualified plumber can assess the condition of your toilet, identify any underlying issues, and provide you with expert recommendations.
Additionally, plumbers often have access to a wide range of toilet models and can help you select the best option based on your specific needs and budget. They can also handle the installation process, ensuring that everything is done correctly and efficiently.
Assessing the need for toilet replacement requires careful consideration of various factors, including the age and condition of the toilet, water efficiency, comfort and accessibility, style and aesthetics, and seeking professional advice when necessary. By evaluating these aspects, you can make an informed decision and choose a toilet that meets your requirements while enhancing the functionality and appearance of your bathroom.
III. Choosing the Right Toilet for Your Home

When it comes to choosing a toilet for your home, there are several factors to consider. As an experienced plumber with over 10 years of experience, I have installed and repaired countless toilets, and I have learned a thing or two about what makes a great toilet. In this section, I will share my insights and recommendations to help you make an informed decision.
1. Determine the Size and Shape
The first step in choosing the right toilet is to determine the size and shape that will fit your bathroom space. Measure the rough-in distance, which is the distance from the wall to the center of the drainpipe. Most toilets have a standard rough-in distance of 12 inches, but there are also 10-inch and 14-inch options available. Additionally, consider the shape of the toilet bowl. The two most common shapes are round and elongated. Round toilets are compact and ideal for small bathrooms, while elongated toilets offer more comfort and are better suited for larger bathrooms.
2. Consider Water Efficiency
Water efficiency is an important factor to consider when choosing a toilet. Look for toilets that are labeled as WaterSense certified. These toilets use less water per flush compared to traditional toilets, which can help you save on your water bills. Additionally, consider whether you want a single-flush or dual-flush toilet. Single-flush toilets have a standard flush for solid waste and liquid waste, while dual-flush toilets have separate buttons or levers for each type of waste, allowing you to choose the appropriate flush volume.
3. Evaluate Flushing Performance
The flushing performance of a toilet is crucial to ensure effective waste removal and prevent clogs. Look for toilets that have a powerful flush and a large trapway. The trapway is the passage through which waste travels from the bowl to the drainpipe. A larger trapway reduces the likelihood of clogs. Additionally, consider toilets with a glazed trapway, as this smooth surface helps waste slide through more easily. Reading user reviews and expert recommendations can give you valuable insights into the flushing performance of different toilet models.
4. Assess Comfort and Height
Comfort is another important factor to consider when choosing a toilet. Look for toilets with a comfortable seat height, especially if you or your family members have mobility issues. Standard toilets have a seat height of around 15 inches, but there are also comfort height toilets available, which have a seat height of around 17 to 19 inches. These taller toilets are more accessible and easier to use for people with limited mobility.
5. Take Style and Design into Account
While functionality is key, the style and design of the toilet should also be considered to ensure it complements your bathroom decor. There are various styles available, including traditional, modern, and contemporary designs. Consider the color, finish, and overall aesthetic appeal of the toilet. Additionally, think about the ease of cleaning. Look for toilets with smooth surfaces and concealed trapways, as these are easier to clean and maintain.
6. Set a Budget
Before making a final decision, it’s important to set a budget for your toilet purchase. Toilet prices can vary greatly depending on the brand, features, and design. Determine how much you are willing to spend and look for options within your budget. Keep in mind that investing in a high-quality toilet can save you money in the long run by reducing water consumption and minimizing the need for repairs.
Choosing the right toilet for your home is a decision that should not be taken lightly. By considering factors such as size, water efficiency, flushing performance, comfort, style, and budget, you can find a toilet that meets your needs and preferences. Remember to do thorough research, read reviews, and consult with professionals if needed. A well-chosen toilet will not only enhance the functionality of your bathroom but also contribute to your overall satisfaction and comfort.
IV. Preparing for Toilet Replacement

Replacing a toilet may seem like a daunting task, but with the right preparation and guidance, it can be a smooth and successful project. As an experienced plumber with over 10 years of expertise in the field, I have encountered various toilet replacement scenarios and learned valuable insights along the way. In this section, I will share my step-by-step process for preparing for a toilet replacement, ensuring that you have all the necessary tools, materials, and knowledge to complete the task efficiently.
Gather the Required Tools and Materials
Before starting the toilet replacement, it is essential to gather all the necessary tools and materials. Here is a comprehensive list of what you will need:
- Adjustable wrench
- Screwdriver (both flathead and Phillips)
- Plunger
- Bucket
- Putty knife
- Tape measure
- New wax ring
- New toilet bowl bolts
- Toilet bowl wax gasket
- Flexible water supply line
- Toilet tank repair kit (optional)
Having these tools and materials ready before you begin will save you time and prevent any unnecessary interruptions during the replacement process.
Turn Off the Water Supply
Prior to removing the old toilet, it is crucial to turn off the water supply. Locate the shut-off valve, usually located on the wall behind the toilet, and turn it clockwise until it is fully closed. This will prevent any water from flowing into the toilet during the replacement.
Remove the Old Toilet
Now that the water supply is turned off, it’s time to remove the old toilet. Start by flushing the toilet to empty the tank and bowl. Use a plunger to remove any remaining water from the bowl and then disconnect the water supply line from the bottom of the tank using an adjustable wrench.
Next, remove the nuts securing the toilet bowl to the floor. These nuts are usually located at the base of the toilet and can be loosened with a wrench or pliers. Once the nuts are removed, carefully lift the toilet bowl straight up and place it on a towel or old newspaper to prevent any water or debris from spilling onto the floor.
Clean the Area and Inspect the Flange
With the old toilet removed, take the opportunity to clean the area thoroughly. Use a putty knife to scrape off any old wax residue from the flange, which is the circular opening in the floor where the toilet sits. Inspect the flange for any damage or cracks. If necessary, repair or replace the flange before proceeding.
Install the New Wax Ring and Toilet Bowl Bolts
Place a new wax ring onto the flange, ensuring that it is centered and properly aligned. The wax ring will create a watertight seal between the toilet and the flange. Insert the new toilet bowl bolts into the slots on the flange, making sure they are secure and upright.
Position and Secure the New Toilet
Now it’s time to position and secure the new toilet. Carefully lift the toilet bowl and align it with the wax ring and toilet bowl bolts. Gently lower the toilet bowl onto the wax ring, ensuring that it is centered and level. Apply downward pressure to compress the wax ring and create a tight seal.
Once the toilet bowl is in place, place a washer and nut onto each toilet bowl bolt and tighten them using a wrench. Be careful not to overtighten, as this can cause damage to the toilet bowl or flange.
Reconnect the Water Supply and Test
With the toilet securely in place, reconnect the water supply line to the bottom of the tank. Use an adjustable wrench to tighten the connection, ensuring that it is snug and leak-free. Slowly turn on the water supply valve to fill the tank, and check for any leaks around the connections.
Once the tank is full, flush the toilet several times to ensure proper functionality. Listen for any unusual sounds or observe any signs of leakage. If everything appears to be in order, congratulations! You have successfully prepared for a toilet replacement.
Remember, if you are unsure or uncomfortable with any step of the process, it is always best to consult a professional plumber. They have the knowledge and experience to handle any challenges that may arise during a toilet replacement.
V. Tools and Materials Required for Toilet Replacement
When it comes to replacing a toilet, having the right tools and materials is essential to ensure a smooth and successful installation. As an experienced plumber with years of expertise in toilet replacement, I have compiled a comprehensive list of the tools and materials you will need for this project. Whether you are a DIY enthusiast or a professional plumber, these items are crucial for a hassle-free toilet replacement.
1. Adjustable Wrench
An adjustable wrench is a versatile tool that will come in handy during various stages of the toilet replacement process. It allows you to easily tighten or loosen nuts and bolts, ensuring a secure fit for the new toilet.
2. Screwdriver Set
A set of screwdrivers with different sizes and types is essential for removing the screws and fasteners that hold the old toilet in place. Flathead and Phillips screwdrivers are the most commonly used types for this task.
3. Plunger
Before you begin the toilet replacement, it’s a good idea to have a plunger on hand. This tool can help you unclog the drain if any blockages occur during the installation process.
4. Putty Knife
A putty knife is useful for removing the old wax ring and any residue left behind on the floor. It allows you to scrape off the stubborn remnants without causing damage to the surface.
5. Hacksaw
In some cases, you may need to cut through bolts or pipes during the toilet replacement. A hacksaw with a fine-tooth blade will make this task easier and more precise.
6. Level
To ensure that your new toilet is properly aligned and balanced, a level is essential. It helps you determine if the toilet is sitting straight and prevents any wobbling or unevenness.
7. Wax Ring
A wax ring is a crucial component that creates a watertight seal between the toilet and the drainpipe. It prevents leaks and odors from escaping, ensuring a hygienic and functional toilet installation.
8. Toilet Bolts and Caps
New toilet bolts and caps are necessary if the existing ones are worn out or damaged. These components secure the toilet to the floor and provide stability and support.
9. Toilet Tank-to-Bowl Gasket
The tank-to-bowl gasket is a rubber seal that connects the toilet tank to the bowl. It prevents leaks and ensures a tight connection between the two components.
10. Water Supply Line
A new water supply line is recommended during toilet replacement to ensure a clean and reliable water source. Choose a flexible supply line that is compatible with your plumbing system.
11. Toilet Bowl Cleaner
While not a tool or material for the installation itself, having a toilet bowl cleaner on hand is essential for maintaining the cleanliness and hygiene of your new toilet. Regular cleaning will keep it looking and smelling fresh.
By having these tools and materials ready before you start the toilet replacement process, you can save time and avoid any unnecessary trips to the hardware store. Remember to follow the manufacturer’s instructions and take all necessary safety precautions during the installation. With the right tools and a little know-how, you can successfully replace your toilet and enjoy a fully functional bathroom.
VI. Removing the Old Toilet
Removing an old toilet can seem like a daunting task, but with the right tools and a little know-how, it can be a relatively straightforward process. In this section, I will guide you through the steps to safely and efficiently remove your old toilet in preparation for a replacement.
Gather the Necessary Tools
Before you begin, make sure you have all the tools you will need for the job. Here’s a list of the essential tools:
- Adjustable wrench
- Putty knife
- Bucket or container
- Gloves
- Towel or rags
- Sponge
Having these tools on hand will make the process much smoother and save you from any unnecessary trips to the hardware store.
Turn Off the Water Supply
Before you can remove the toilet, you need to turn off the water supply. Locate the shut-off valve, which is usually located on the wall behind the toilet. Turn the valve clockwise to shut off the water flow. Once the water is turned off, flush the toilet to drain any remaining water in the tank and bowl.
Disconnect the Water Supply Line
With the water supply turned off, you can now disconnect the water supply line from the bottom of the toilet tank. Use an adjustable wrench to loosen the nut connecting the supply line to the fill valve. Once the nut is loose, you can remove the supply line from the tank. Be prepared for a small amount of water to spill out when you disconnect the line.
Remove the Tank
Next, you’ll need to remove the tank from the bowl. Start by removing the tank lid and setting it aside. Use an adjustable wrench to loosen the nuts on the tank bolts located at the bottom of the tank. Once the nuts are loose, you can lift the tank straight up and off the bowl. Place the tank in a safe location to avoid any accidental damage.
Disconnect the Bowl
Now it’s time to disconnect the bowl from the floor. Start by removing the caps covering the bolts at the base of the toilet. Use a putty knife to pry off the caps gently. Once the caps are removed, use an adjustable wrench to loosen and remove the nuts from the bolts. With the nuts removed, you can lift the bowl straight up and off the floor. Be careful when lifting, as toilets can be heavy.
Prepare for Disposal
Once the old toilet is removed, you’ll need to prepare it for disposal. Start by emptying any remaining water in the bowl into a bucket or container. You can use a sponge or towel to soak up any excess water. Wipe down the toilet and remove any remaining wax or debris from the flange.
It’s important to note that toilets should be disposed of properly. Check with your local waste management facility for guidelines on how to dispose of your old toilet in an environmentally friendly manner.
VII. Installing the New Toilet
So, you’ve finally decided to replace your old toilet with a brand new one. Congratulations! Installing a new toilet may seem like a daunting task, but with the right tools and a little bit of know-how, you can do it yourself and save some money in the process. In this section, I will walk you through the step-by-step process of installing a new toilet.
Gather the Necessary Tools and Materials
Before you begin the installation process, make sure you have all the necessary tools and materials. Here’s a list of what you’ll need:
- New toilet
- Toilet wax ring
- Toilet bolts
- Adjustable wrench
- Screwdriver
- Putty knife
- Level
- Tape measure
- Bucket
- Rags
- Gloves
Remove the Old Toilet
The first step in installing a new toilet is to remove the old one. Start by turning off the water supply to the toilet. You can usually find the shut-off valve behind the toilet near the floor. Once the water is turned off, flush the toilet to empty the tank and bowl.
Next, disconnect the water supply line from the bottom of the toilet tank. Use an adjustable wrench to loosen the nut and then remove the line. Place a bucket under the connection to catch any remaining water.
Now, remove the nuts from the toilet bolts that secure the toilet to the floor. You may need to use a screwdriver to hold the bolts in place while you loosen the nuts. Once the nuts are removed, carefully lift the toilet straight up and off the bolts. Set the old toilet aside.
Prepare the Area for the New Toilet
With the old toilet removed, it’s time to prepare the area for the new one. Start by removing the old wax ring from the flange on the floor. Use a putty knife to scrape off any remaining wax and clean the area thoroughly.
Next, measure the distance between the flange and the wall. This will help you determine the rough-in measurement for your new toilet. The rough-in measurement is the distance from the wall to the center of the flange. Most toilets have a rough-in measurement of either 10 inches or 12 inches.
If the rough-in measurement is not standard, you may need to purchase a toilet with an adjustable rough-in or make adjustments to the flange or drain pipe. Consult a professional plumber if you’re unsure how to proceed.
Install the New Toilet
Now it’s time to install the new toilet. Start by placing a new wax ring onto the flange. Make sure the wax ring is centered over the flange and press it down firmly to create a watertight seal.
Next, carefully lower the new toilet onto the wax ring, making sure the toilet bolts align with the holes in the base of the toilet. Once the toilet is in place, apply gentle pressure to compress the wax ring and create a secure seal.
Now, place a level on top of the toilet tank and adjust the toilet until it is level in both directions. Once the toilet is level, tighten the nuts onto the toilet bolts to secure the toilet to the floor. Be careful not to overtighten the nuts, as this could crack the toilet base.
After the toilet is securely fastened, reconnect the water supply line to the bottom of the toilet tank. Use an adjustable wrench to tighten the nut and ensure a watertight connection. Turn on the water supply and check for any leaks.
Test the New Toilet
With the installation complete, it’s time to test your new toilet. Flush the toilet several times to ensure it is working properly and there are no leaks. Check the base of the toilet and around the water supply line for any signs of water. If you notice any leaks, tighten the connections or consult a professional plumber.
Congratulations! You have successfully installed a new toilet. Now you can enjoy the benefits of a modern, efficient toilet in your bathroom. Remember to properly dispose of your old toilet and any packaging materials from the new one. Happy flushing!
VIII. Connecting the Water Supply
Connecting the water supply is a crucial step in the process of replacing a toilet. It ensures that the new toilet will have a steady flow of water for flushing and refilling the tank. Here, I will guide you through the steps to properly connect the water supply to your new toilet.
1. Gather the necessary tools and materials
Before you begin, make sure you have all the tools and materials you’ll need for this task. These may include:
- Adjustable wrench
- Teflon tape
- Flexible water supply line
- Bucket or towel
Having these items ready will help streamline the process and ensure a smooth installation.
2. Shut off the water supply
Prior to connecting the water supply, you must first shut off the water. Locate the shut-off valve, usually located near the base of the toilet or on the wall behind it. Turn the valve clockwise until it is fully closed. This will prevent any water from flowing while you work.
3. Disconnect the old water supply line
Next, you’ll need to disconnect the old water supply line from the shut-off valve. Use an adjustable wrench to loosen the nut connecting the supply line to the valve. Once loose, carefully remove the supply line from the valve. Be prepared for any residual water to drain into a bucket or towel.
4. Prepare the new water supply line
Now it’s time to prepare the new water supply line. Apply Teflon tape to the threaded end of the supply line to ensure a tight seal. This will prevent any leaks once the line is connected.
5. Connect the new water supply line
With the Teflon tape applied, attach the new water supply line to the shut-off valve. Use the adjustable wrench to tighten the nut, ensuring a secure connection. Be careful not to overtighten, as this can cause damage to the valve or supply line.
6. Attach the other end to the toilet tank
Once the supply line is securely connected to the shut-off valve, it’s time to attach the other end to the toilet tank. Locate the water inlet on the bottom of the tank and screw the supply line onto it. Again, use the adjustable wrench to tighten the nut, but be cautious not to overtighten.
7. Turn on the water supply
With the supply line properly connected, it’s time to turn on the water supply. Slowly open the shut-off valve by turning it counterclockwise. This will allow water to flow into the toilet tank. Keep an eye out for any leaks around the connections and tighten them if necessary.
8. Check for leaks and test the toilet
Once the water supply is turned on, carefully inspect all the connections for any signs of leaks. If you notice any leaks, tighten the connections further or consider replacing any faulty parts. Once you’re confident that there are no leaks, flush the toilet and observe if it fills and flushes properly.
By following these steps, you can successfully connect the water supply to your new toilet. Remember to take your time and double-check all the connections to ensure a leak-free and properly functioning toilet.
IX. Testing the Newly Installed Toilet
After successfully installing your new toilet, it’s important to thoroughly test it to ensure it functions properly. This step is crucial as it allows you to identify any potential issues and make any necessary adjustments before completing the installation process. Here’s a step-by-step guide on how to test your newly installed toilet:
1. Check for Leaks
The first thing you should do is check for any leaks. Start by inspecting the base of the toilet and the connections to the water supply line. Look for any signs of water pooling or dripping. If you notice any leaks, tighten the connections or replace any faulty parts.
2. Flush the Toilet
Next, flush the toilet to ensure it flushes properly. Pay attention to the water flow and make sure it is strong and consistent. If the flush seems weak or the water doesn’t drain properly, there may be a clog or an issue with the flushing mechanism. In this case, you may need to adjust the water level or check the flush valve.
3. Test the Fill Valve
After flushing, listen for any unusual sounds coming from the toilet tank. If you hear a hissing or running water noise, it could indicate a problem with the fill valve. To test the fill valve, lift the float arm and observe if the water stops flowing. If it doesn’t, you may need to adjust or replace the fill valve.
4. Check the Water Level
Inspect the water level in the toilet tank. It should be about an inch below the overflow tube. If the water level is too high or too low, adjust the float arm or the fill valve to achieve the correct water level. This ensures proper flushing and prevents water from overflowing.
5. Test the Flapper Valve
The flapper valve is responsible for sealing the flush valve and preventing water from continuously flowing into the toilet bowl. To test the flapper valve, add a few drops of food coloring into the toilet tank. Wait for a few minutes without flushing. If the water in the bowl changes color, it indicates a faulty flapper valve that needs to be replaced.
6. Check the Toilet Seat
Lastly, check the toilet seat for stability and comfort. Ensure that it is securely attached and doesn’t wobble. Sit on the seat and make sure it feels comfortable and properly aligned with the toilet bowl. If necessary, adjust the seat or replace it with a more suitable one.
By following these steps, you can confidently test your newly installed toilet and address any issues that may arise. Remember, proper testing is essential to ensure the longevity and functionality of your toilet.

Michael Rasmussen is an accomplished writer with a passion for creating engaging content. Born and raised in a small town in Denmark, Michael developed a love for storytelling from a young age. He pursued his education at the prestigious Aarhus University, where he obtained a Bachelor’s degree in Literature and Creative Writing. With a unique perspective on life, Michael’s writing often delves into the intricacies of everyday experiences, including his quirky fascination with toilets. His ability to blend humor and insight has garnered him a loyal following of readers who appreciate his distinctive style. When he’s not busy crafting captivating narratives, Michael enjoys exploring the great outdoors and seeking inspiration in unexpected places.